This tutorial will outline the steps required to launch a Nextflow pipeline on Latch.Documentation Index
Fetch the complete documentation index at: https://wiki.latch.bio/llms.txt
Use this file to discover all available pages before exploring further.
Prerequisites
- Register for an account and log into the Latch Console
- Install the Latch SDK
>= 2.67.5
$ python3 -m venv env
$ source env/bin/activate
$ pip install latch
It’s highly recommended to install the Latch SDK in a fresh environment for best behavior.
Step 1: Clone your Nextflow pipeline
We will use nf-core’s rnaseq as an example; however, feel free to follow along with any Nextflow pipeline.git clone https://github.com/nf-core/rnaseq
cd rnaseq
Step 2: Define metadata and workflow graphical interface
The input parameters need to be explicitly defined to construct a graphical interface for a Nextflow pipeline. These parameters will be exposed to scientists in a web interface once the workflow is uploaded to Latch. The Latch SDK provides a command to automatically generate the metadata file from an existingnextflow_schema.json file. When developers change their workflow in the future, they can simply update the nextflow_schema.json file and re-run the generate-metadata command again to update the metadata file.
latch generate-metadata nextflow_schema.json --nextflow
nextflow_schema.json and generates two files:
latch_metadata/generated.py
latch_metadata/__init__.py
latch_metadata/generated.py
This file defines workflow parameters and controls how they appear in the UI.
latch_metadata/generated.py
# This file is auto-generated, PLEASE DO NOT EDIT DIRECTLY! To update, run
#
#   $ latch generate-metadata --nextflow nextflow_schema.json
#
# Add any custom logic or parameters in `latch_metadata/__init__.py`.

import typing
from dataclasses import dataclass, field
from enum import Enum

import typing_extensions
from flytekit.core.annotation import FlyteAnnotation

from latch.ldata.path import LPath
from latch.types.directory import LatchDir
from latch.types.file import LatchFile
from latch.types.metadata import Params, Section, Spoiler, Text
from latch.types.samplesheet_item import SamplesheetItem


class StrandednessType(Enum):
    forward = 'forward'
    reverse = 'reverse'
    unstranded = 'unstranded'
    auto = 'auto'


@dataclass
class InputType:
    sample: typing_extensions.Annotated[str, FlyteAnnotation({'display_name': 'Sample', 'default': None, 'samplesheet': False, 'output': False, 'required': True, 'errorMessage': 'Sample name must be provided and cannot contain spaces'})]
    fastq_1: typing_extensions.Annotated[LatchFile, FlyteAnnotation({'display_name': 'Fastq 1', 'default': None, 'samplesheet': False, 'output': False, 'required': True, 'errorMessage': "FastQ file for reads 1 must be provided, cannot contain spaces and must have extension '.fq.gz' or '.fastq.gz'"})]
    fastq_2: typing_extensions.Annotated[typing.Optional[LatchFile], FlyteAnnotation({'display_name': 'Fastq 2', 'default': None, 'samplesheet': False, 'output': False, 'required': False, 'errorMessage': "FastQ file for reads 2 cannot contain spaces and must have extension '.fq.gz' or '.fastq.gz'"})]
    strandedness: typing_extensions.Annotated[StrandednessType, FlyteAnnotation({'display_name': 'Strandedness', 'default': None, 'samplesheet': False, 'output': False, 'required': True, 'errorMessage': "Strandedness must be provided and be one of 'auto', 'forward', 'reverse' or 'unstranded'"})]


class PseudoAlignerType(Enum):
    salmon = 'salmon'
    kallisto = 'kallisto'


class SalmonQuantLibtypeType(Enum):
    A = 'A'
    IS = 'IS'
    ISF = 'ISF'
    ISR = 'ISR'
    IU = 'IU'
    MS = 'MS'
    MSF = 'MSF'
    MSR = 'MSR'
    MU = 'MU'
    OS = 'OS'
    OSF = 'OSF'
    OSR = 'OSR'
    OU = 'OU'
    SF = 'SF'
    SR = 'SR'
    U = 'U'


class ContaminantScreeningType(Enum):
    kraken2 = 'kraken2'
    kraken2_bracken = 'kraken2_bracken'


class TrimmerType(Enum):
    trimgalore = 'trimgalore'
    fastp = 'fastp'


class UmiDedupToolType(Enum):
    umitools = 'umitools'
    umicollapse = 'umicollapse'


class UmitoolsGroupingMethodType(Enum):
    unique = 'unique'
    percentile = 'percentile'
    cluster = 'cluster'
    adjacency = 'adjacency'
    directional = 'directional'


class AlignerType(Enum):
    star_salmon = 'star_salmon'
    star_rsem = 'star_rsem'
    hisat2 = 'hisat2'


class BrackenPrecisionType(Enum):
    D = 'D'
    P = 'P'
    C = 'C'
    O = 'O'
    F = 'F'
    G = 'G'
    S = 'S'


class PublishDirModeType(Enum):
    symlink = 'symlink'
    rellink = 'rellink'
    link = 'link'
    copy = 'copy'
    copyNoFollow = 'copyNoFollow'
    move = 'move'


@dataclass
class NextflowSchemaArgsType:
    input: typing_extensions.Annotated[typing.List[SamplesheetItem[InputType]], FlyteAnnotation({'display_name': 'Input', 'default': None, 'samplesheet': True, 'output': False, 'required': True, 'description': 'Path to the sample sheet (CSV) containing metadata about the experimental samples.', 'help_text': 'Provide the full path to a comma-separated sample sheet with 4 columns and a header row. This file is required to run the pipeline. See the [nf-core/rnaseq sample sheet documentation](https://nf-co.re/rnaseq/usage#samplesheet-input) for example format.', 'errorMessage': "The input must be a valid CSV file path with no spaces, ending in '.csv', and must exist."})]
    outdir: typing_extensions.Annotated[LatchDir, FlyteAnnotation({'display_name': 'Outdir', 'default': None, 'samplesheet': False, 'output': True, 'required': True, 'description': 'The output directory where the results will be saved. You have to use absolute paths to storage on Cloud infrastructure.'})]
    email: typing_extensions.Annotated[typing.Optional[str], FlyteAnnotation({'display_name': 'Email', 'default': None, 'samplesheet': False, 'output': False, 'required': False, 'description': 'Email address for completion summary.', 'help_text': "Provide your email address to receive a summary report when the workflow completes. If set in your user config file (`~/.nextflow/config`), you don't need to specify this for each run.", 'errorMessage': "The email must be a valid address in the format 'name@example.com' and must not contain spaces."})]
    multiqc_title: typing_extensions.Annotated[typing.Optional[str], FlyteAnnotation({'display_name': 'Multiqc Title', 'default': None, 'samplesheet': False, 'output': False, 'required': False, 'description': 'MultiQC report title. Printed as page header, used for filename if not otherwise specified.'})]
    genome: typing_extensions.Annotated[typing.Optional[str], FlyteAnnotation({'display_name': 'Genome', 'default': None, 'samplesheet': False, 'output': False, 'required': False, 'description': 'Name of iGenomes reference.', 'help_text': 'If using a reference genome configured with iGenomes (not recommended), provide the ID for the reference (e.g., `--genome GRCh38`). This builds paths for all required reference files. See the [nf-core documentation](https://nf-co.re/usage/reference_genomes) for details.', 'errorMessage': 'The genome name must not contain spaces and must be a valid identifier.'})]
    fasta: typing_extensions.Annotated[typing.Optional[LatchFile], FlyteAnnotation({'display_name': 'Fasta', 'default': None, 'samplesheet': False, 'output': False, 'required': False, 'description': 'Path to FASTA genome file.', 'help_text': "This parameter is mandatory if `--genome` is not specified. If you don't have the appropriate alignment index, it will be generated automatically. Use with `--save_reference` to store the index for future runs.", 'errorMessage': 'The FASTA file path must end with .fa, .fna, .fasta optionally with .gz, must not contain spaces, and must exist.'})]
    gtf: typing_extensions.Annotated[typing.Optional[LatchFile], FlyteAnnotation({'display_name': 'Gtf', 'default': None, 'samplesheet': False, 'output': False, 'required': False, 'description': 'Path to GTF annotation file.', 'help_text': 'This parameter is mandatory if `--genome` is not specified.', 'errorMessage': 'The GTF file must have a .gtf or .gtf.gz extension, must not contain spaces, and must exist.'})]
    gff: typing_extensions.Annotated[typing.Optional[LatchFile], FlyteAnnotation({'display_name': 'Gff', 'default': None, 'samplesheet': False, 'output': False, 'required': False, 'description': 'Path to GFF3 annotation file.', 'help_text': 'This parameter must be specified if neither `--genome` nor `--gtf` is provided.', 'errorMessage': 'The GFF file must have a .gff or .gff.gz extension, must not contain spaces, and must exist.'})]
    gene_bed: typing_extensions.Annotated[typing.Optional[LatchFile], FlyteAnnotation({'display_name': 'Gene Bed', 'default': None, 'samplesheet': False, 'output': False, 'required': False, 'description': 'Path to BED file containing gene intervals. This will be created from the GTF file if not specified.', 'errorMessage': 'The BED file must have a .bed or .bed.gz extension, must not contain spaces, and must exist.'})]
    transcript_fasta: typing_extensions.Annotated[typing.Optional[LatchFile], FlyteAnnotation({'display_name': 'Transcript Fasta', 'default': None, 'samplesheet': False, 'output': False, 'required': False, 'description': 'Path to FASTA transcriptome file.'})]
    additional_fasta: typing_extensions.Annotated[typing.Optional[LatchFile], FlyteAnnotation({'display_name': 'Additional Fasta', 'default': None, 'samplesheet': False, 'output': False, 'required': False, 'description': 'FASTA file to concatenate to genome FASTA file e.g. containing spike-in sequences.', 'help_text': 'If provided, sequences in this file will be concatenated to the genome FASTA file. A GTF file will be automatically created using these sequences, and alignment indices will be created from the combined files. Use `--save_reference` to reuse these indices in future runs.'})]
    splicesites: typing_extensions.Annotated[typing.Optional[LatchFile], FlyteAnnotation({'display_name': 'Splicesites', 'default': None, 'samplesheet': False, 'output': False, 'required': False, 'description': 'Splice sites file required for HISAT2.'})]
    star_index: typing_extensions.Annotated[typing.Optional[LPath], FlyteAnnotation({'display_name': 'Star Index', 'default': None, 'samplesheet': False, 'output': False, 'required': False, 'description': 'Path to directory or tar.gz archive for pre-built STAR index.'})]
    hisat2_index: typing_extensions.Annotated[typing.Optional[LPath], FlyteAnnotation({'display_name': 'Hisat2 Index', 'default': None, 'samplesheet': False, 'output': False, 'required': False, 'description': 'Path to directory or tar.gz archive for pre-built HISAT2 index.'})]
    rsem_index: typing_extensions.Annotated[typing.Optional[LPath], FlyteAnnotation({'display_name': 'Rsem Index', 'default': None, 'samplesheet': False, 'output': False, 'required': False, 'description': 'Path to directory or tar.gz archive for pre-built RSEM index.'})]
    salmon_index: typing_extensions.Annotated[typing.Optional[LPath], FlyteAnnotation({'display_name': 'Salmon Index', 'default': None, 'samplesheet': False, 'output': False, 'required': False, 'description': 'Path to directory or tar.gz archive for pre-built Salmon index.'})]
    kallisto_index: typing_extensions.Annotated[typing.Optional[LPath], FlyteAnnotation({'display_name': 'Kallisto Index', 'default': None, 'samplesheet': False, 'output': False, 'required': False, 'description': 'Path to directory or tar.gz archive for pre-built Kallisto index.'})]
    gencode: typing_extensions.Annotated[typing.Optional[bool], FlyteAnnotation({'display_name': 'Gencode', 'default': None, 'samplesheet': False, 'output': False, 'required': False, 'description': 'Specify if your GTF annotation is in GENCODE format.', 'help_text': 'If your GTF file is in GENCODE format and you want to run Salmon (using `--pseudo_aligner salmon`), enable this parameter to build the Salmon index correctly.'})]
    igenomes_ignore: typing_extensions.Annotated[typing.Optional[bool], FlyteAnnotation({'display_name': 'Igenomes Ignore', 'default': None, 'samplesheet': False, 'output': False, 'required': False, 'description': 'Do not load the iGenomes reference config.', 'help_text': 'Prevent loading of `igenomes.config` when running the pipeline. Use this option if you encounter conflicts between custom parameters and those in the iGenomes configuration.'})]
    extra_trimgalore_args: typing_extensions.Annotated[typing.Optional[str], FlyteAnnotation({'display_name': 'Extra Trimgalore Args', 'default': None, 'samplesheet': False, 'output': False, 'required': False, 'description': 'Extra arguments to pass to Trim Galore! command in addition to defaults defined by the pipeline.'})]
    extra_fastp_args: typing_extensions.Annotated[typing.Optional[str], FlyteAnnotation({'display_name': 'Extra Fastp Args', 'default': None, 'samplesheet': False, 'output': False, 'required': False, 'description': 'Extra arguments to pass to fastp command in addition to defaults defined by the pipeline.'})]
    bbsplit_fasta_list: typing_extensions.Annotated[typing.Optional[LatchFile], FlyteAnnotation({'display_name': 'Bbsplit Fasta List', 'default': None, 'samplesheet': False, 'output': False, 'required': False, 'description': 'Path to comma-separated file containing a list of reference genomes to filter reads against with BBSplit. You have to also explicitly set `--skip_bbsplit false` if you want to use BBSplit.', 'help_text': 'The file should contain 2 columns: short name and full path to reference genome(s), for example:\n```\nmm10,/path/to/mm10.fa\necoli,/path/to/ecoli.fa\n```'})]
    bbsplit_index: typing_extensions.Annotated[typing.Optional[LPath], FlyteAnnotation({'display_name': 'Bbsplit Index', 'default': None, 'samplesheet': False, 'output': False, 'required': False, 'description': 'Path to directory or tar.gz archive for pre-built BBSplit index.', 'help_text': 'The BBSplit index must be built at least once with this pipeline. Use `--save_reference` to save the index, which can then be provided via `--bbsplit_index` for future runs.'})]
    sortmerna_index: typing_extensions.Annotated[typing.Optional[LPath], FlyteAnnotation({'display_name': 'Sortmerna Index', 'default': None, 'samplesheet': False, 'output': False, 'required': False, 'description': 'Path to directory or tar.gz archive for pre-built sortmerna index.', 'help_text': 'The SortMeRNA index must be built at least once with this pipeline. Use `--save_reference` to save the index, which can then be provided via `--sortmerna_index` for future runs.'})]
    remove_ribo_rna: typing_extensions.Annotated[typing.Optional[bool], FlyteAnnotation({'display_name': 'Remove Ribo Rna', 'default': None, 'samplesheet': False, 'output': False, 'required': False, 'description': 'Enable the removal of reads derived from ribosomal RNA using SortMeRNA.', 'help_text': 'Any patterns found in sequences defined by the `--ribo_database_manifest` parameter will be used for filtering.'})]
    with_umi: typing_extensions.Annotated[typing.Optional[bool], FlyteAnnotation({'display_name': 'With Umi', 'default': None, 'samplesheet': False, 'output': False, 'required': False, 'description': 'Enable UMI-based read deduplication.'})]
    umitools_bc_pattern: typing_extensions.Annotated[typing.Optional[str], FlyteAnnotation({'display_name': 'Umitools Bc Pattern', 'default': None, 'samplesheet': False, 'output': False, 'required': False, 'description': "The UMI barcode pattern to use e.g. 'NNNNNN' indicates that the first 6 nucleotides of the read are from the UMI.", 'help_text': 'Detailed information can be found in the [UMI-tools documentation](https://umi-tools.readthedocs.io/en/latest/reference/extract.html#extract-method).'})]
    umitools_bc_pattern2: typing_extensions.Annotated[typing.Optional[str], FlyteAnnotation({'display_name': 'Umitools Bc Pattern2', 'default': None, 'samplesheet': False, 'output': False, 'required': False, 'description': 'The UMI barcode pattern to use if the UMI is located in read 2.'})]
    umi_discard_read: typing_extensions.Annotated[typing.Optional[int], FlyteAnnotation({'display_name': 'Umi Discard Read', 'default': None, 'samplesheet': False, 'output': False, 'required': False, 'description': 'After UMI barcode extraction discard either R1 or R2 by setting this parameter to 1 or 2, respectively.'})]
    umitools_umi_separator: typing_extensions.Annotated[typing.Optional[str], FlyteAnnotation({'display_name': 'Umitools Umi Separator', 'default': None, 'samplesheet': False, 'output': False, 'required': False, 'description': 'The character that separates the UMI in the read name. Most likely a colon if you skipped the extraction with UMI-tools and used other software.', 'errorMessage': "The UMI separator must not contain spaces and must be a single character (e.g., ':')."})]
    umitools_dedup_stats: typing_extensions.Annotated[typing.Optional[bool], FlyteAnnotation({'display_name': 'Umitools Dedup Stats', 'default': None, 'samplesheet': False, 'output': False, 'required': False, 'description': 'Generate output stats when running "umi_tools dedup".', 'help_text': 'Generating these output statistics can be time-consuming. See [issue #827](https://github.com/nf-core/rnaseq/issues/827) for more information.'})]
    use_sentieon_star: typing_extensions.Annotated[typing.Optional[bool], FlyteAnnotation({'display_name': 'Use Sentieon Star', 'default': None, 'samplesheet': False, 'output': False, 'required': False, 'description': 'Optionally accelerate STAR with Sentieon'})]
    pseudo_aligner: typing_extensions.Annotated[typing.Optional[PseudoAlignerType], FlyteAnnotation({'display_name': 'Pseudo Aligner', 'default': None, 'samplesheet': False, 'output': False, 'required': False, 'description': "Specifies the pseudo aligner to use - available options are 'salmon'. Runs in addition to '--aligner'."})]
    bam_csi_index: typing_extensions.Annotated[typing.Optional[bool], FlyteAnnotation({'display_name': 'Bam Csi Index', 'default': None, 'samplesheet': False, 'output': False, 'required': False, 'description': 'Create a CSI index for BAM files instead of the traditional BAI index. This will be required for genomes with larger chromosome sizes.'})]
    star_ignore_sjdbgtf: typing_extensions.Annotated[typing.Optional[bool], FlyteAnnotation({'display_name': 'Star Ignore Sjdbgtf', 'default': None, 'samplesheet': False, 'output': False, 'required': False, 'description': 'When using pre-built STAR indices do not re-extract and use splice junctions from the GTF file.'})]
    salmon_quant_libtype: typing_extensions.Annotated[typing.Optional[SalmonQuantLibtypeType], FlyteAnnotation({'display_name': 'Salmon Quant Libtype', 'default': None, 'samplesheet': False, 'output': False, 'required': False, 'description': ' Override Salmon library type inferred based on strandedness defined in meta object.', 'help_text': 'Refer to the [Salmon documentation](https://salmon.readthedocs.io/en/latest/library_type.html) for details on library types.'})]
    seq_center: typing_extensions.Annotated[typing.Optional[str], FlyteAnnotation({'display_name': 'Seq Center', 'default': None, 'samplesheet': False, 'output': False, 'required': False, 'description': 'Sequencing center information to be added to read group of BAM files.'})]
    stringtie_ignore_gtf: typing_extensions.Annotated[typing.Optional[bool], FlyteAnnotation({'display_name': 'Stringtie Ignore Gtf', 'default': None, 'samplesheet': False, 'output': False, 'required': False, 'description': 'Perform reference-guided de novo assembly of transcripts using StringTie i.e. don't restrict to those in GTF file.'})]
    extra_star_align_args: typing_extensions.Annotated[typing.Optional[str], FlyteAnnotation({'display_name': 'Extra Star Align Args', 'default': None, 'samplesheet': False, 'output': False, 'required': False, 'description': 'Extra arguments to pass to STAR alignment command in addition to defaults defined by the pipeline. Only available for the STAR-Salmon route.'})]
    extra_salmon_quant_args: typing_extensions.Annotated[typing.Optional[str], FlyteAnnotation({'display_name': 'Extra Salmon Quant Args', 'default': None, 'samplesheet': False, 'output': False, 'required': False, 'description': 'Extra arguments to pass to Salmon quant command in addition to defaults defined by the pipeline.'})]
    extra_kallisto_quant_args: typing_extensions.Annotated[typing.Optional[str], FlyteAnnotation({'display_name': 'Extra Kallisto Quant Args', 'default': None, 'samplesheet': False, 'output': False, 'required': False, 'description': 'Extra arguments to pass to Kallisto quant command in addition to defaults defined by the pipeline.'})]
    save_merged_fastq: typing_extensions.Annotated[typing.Optional[bool], FlyteAnnotation({'display_name': 'Save Merged Fastq', 'default': None, 'samplesheet': False, 'output': False, 'required': False, 'description': 'Save FastQ files after merging re-sequenced libraries in the results directory.'})]
    save_umi_intermeds: typing_extensions.Annotated[typing.Optional[bool], FlyteAnnotation({'display_name': 'Save Umi Intermeds', 'default': None, 'samplesheet': False, 'output': False, 'required': False, 'description': 'If this option is specified, intermediate FastQ and BAM files produced by UMI-tools are also saved in the results directory.'})]
    save_non_ribo_reads: typing_extensions.Annotated[typing.Optional[bool], FlyteAnnotation({'display_name': 'Save Non Ribo Reads', 'default': None, 'samplesheet': False, 'output': False, 'required': False, 'description': 'If this option is specified, intermediate FastQ files containing non-rRNA reads will be saved in the results directory.'})]
    save_bbsplit_reads: typing_extensions.Annotated[typing.Optional[bool], FlyteAnnotation({'display_name': 'Save Bbsplit Reads', 'default': None, 'samplesheet': False, 'output': False, 'required': False, 'description': 'If this option is specified, FastQ files split by reference will be saved in the results directory.'})]
    save_reference: typing_extensions.Annotated[typing.Optional[bool], FlyteAnnotation({'display_name': 'Save Reference', 'default': None, 'samplesheet': False, 'output': False, 'required': False, 'description': 'If generated by the pipeline save the STAR index in the results directory.', 'help_text': 'If the pipeline generates an alignment index, use this parameter to save it to your results folder for future pipeline runs, reducing processing time.'})]
    save_trimmed: typing_extensions.Annotated[typing.Optional[bool], FlyteAnnotation({'display_name': 'Save Trimmed', 'default': None, 'samplesheet': False, 'output': False, 'required': False, 'description': 'Save the trimmed FastQ files in the results directory.', 'help_text': 'By default, trimmed FastQ files are not saved. Enable this option to copy these files to the results directory.'})]
    save_align_intermeds: typing_extensions.Annotated[typing.Optional[bool], FlyteAnnotation({'display_name': 'Save Align Intermeds', 'default': None, 'samplesheet': False, 'output': False, 'required': False, 'description': 'Save the intermediate BAM files from the alignment step.', 'help_text': 'By default, only final filtered BAM files are saved to conserve storage. Enable this option to also save intermediate BAM files from the alignment process.'})]
    save_unaligned: typing_extensions.Annotated[typing.Optional[bool], FlyteAnnotation({'display_name': 'Save Unaligned', 'default': None, 'samplesheet': False, 'output': False, 'required': False, 'description': 'Where possible, save unaligned reads from either STAR, HISAT2 or Salmon to the results directory.', 'help_text': 'Output may be in FastQ or BAM format depending on the options available for the specific alignment tool used.'})]
    save_kraken_assignments: typing_extensions.Annotated[typing.Optional[bool], FlyteAnnotation({'display_name': 'Save Kraken Assignments', 'default': None, 'samplesheet': False, 'output': False, 'required': False, 'description': 'Save read-by-read assignments from Kraken2.', 'help_text': 'The `--kraken_db` parameter must be provided to use this option.'})]
    save_kraken_unassigned: typing_extensions.Annotated[typing.Optional[bool], FlyteAnnotation({'display_name': 'Save Kraken Unassigned', 'default': None, 'samplesheet': False, 'output': False, 'required': False, 'description': 'Save reads that were not given assignment from Kraken2.', 'help_text': 'The `--kraken_db` parameter must be provided to use this option.'})]
    contaminant_screening: typing_extensions.Annotated[typing.Optional[ContaminantScreeningType], FlyteAnnotation({'display_name': 'Contaminant Screening', 'default': None, 'samplesheet': False, 'output': False, 'required': False, 'description': "Tool to use for detecting contaminants in unaligned reads - available options are 'kraken2' and 'kraken2_bracken'"})]
    kraken_db: typing_extensions.Annotated[typing.Optional[LatchDir], FlyteAnnotation({'display_name': 'Kraken Db', 'default': None, 'samplesheet': False, 'output': False, 'required': False, 'description': 'Database when using Kraken2/Bracken for contaminant screening.', 'help_text': 'See the usage documentation for more information on setting up and using Kraken2 databases.'})]
    skip_gtf_filter: typing_extensions.Annotated[typing.Optional[bool], FlyteAnnotation({'display_name': 'Skip Gtf Filter', 'default': None, 'samplesheet': False, 'output': False, 'required': False, 'description': 'Skip filtering of GTF for valid scaffolds and/or transcript IDs.', 'help_text': "If you're confident in your GTF file's compatibility with the genome FASTA file, or want to ignore filtering errors, enable this option."})]
    skip_gtf_transcript_filter: typing_extensions.Annotated[typing.Optional[bool], FlyteAnnotation({'display_name': 'Skip Gtf Transcript Filter', 'default': None, 'samplesheet': False, 'output': False, 'required': False, 'description': "Skip the 'transcript_id' checking component of the GTF filtering script used in the pipeline. Ensure the GTF file is valid."})]
    skip_umi_extract: typing_extensions.Annotated[typing.Optional[bool], FlyteAnnotation({'display_name': 'Skip Umi Extract', 'default': None, 'samplesheet': False, 'output': False, 'required': False, 'description': 'Skip the UMI extraction from the read in case the UMIs have been moved to the headers in advance of the pipeline run.'})]
    skip_linting: typing_extensions.Annotated[typing.Optional[bool], FlyteAnnotation({'display_name': 'Skip Linting', 'default': None, 'samplesheet': False, 'output': False, 'required': False, 'description': 'Skip linting checks during FASTQ preprocessing and filtering.'})]
    skip_trimming: typing_extensions.Annotated[typing.Optional[bool], FlyteAnnotation({'display_name': 'Skip Trimming', 'default': None, 'samplesheet': False, 'output': False, 'required': False, 'description': 'Skip the adapter trimming step.', 'help_text': "Use this option if your FastQ files have already been trimmed or if you're certain they contain no adapter contamination."})]
    skip_alignment: typing_extensions.Annotated[typing.Optional[bool], FlyteAnnotation({'display_name': 'Skip Alignment', 'default': None, 'samplesheet': False, 'output': False, 'required': False, 'description': 'Skip all alignment-based processes within the pipeline.'})]
    skip_pseudo_alignment: typing_extensions.Annotated[typing.Optional[bool], FlyteAnnotation({'display_name': 'Skip Pseudo Alignment', 'default': None, 'samplesheet': False, 'output': False, 'required': False, 'description': 'Skip all pseudo-alignment-based processes within the pipeline.'})]
    skip_markduplicates: typing_extensions.Annotated[typing.Optional[bool], FlyteAnnotation({'display_name': 'Skip Markduplicates', 'default': None, 'samplesheet': False, 'output': False, 'required': False, 'description': 'Skip picard MarkDuplicates step.'})]
    skip_bigwig: typing_extensions.Annotated[typing.Optional[bool], FlyteAnnotation({'display_name': 'Skip Bigwig', 'default': None, 'samplesheet': False, 'output': False, 'required': False, 'description': 'Skip bigWig file creation.'})]
    skip_stringtie: typing_extensions.Annotated[typing.Optional[bool], FlyteAnnotation({'display_name': 'Skip Stringtie', 'default': None, 'samplesheet': False, 'output': False, 'required': False, 'description': 'Skip StringTie.'})]
    skip_fastqc: typing_extensions.Annotated[typing.Optional[bool], FlyteAnnotation({'display_name': 'Skip Fastqc', 'default': None, 'samplesheet': False, 'output': False, 'required': False, 'description': 'Skip FastQC.'})]
    skip_dupradar: typing_extensions.Annotated[typing.Optional[bool], FlyteAnnotation({'display_name': 'Skip Dupradar', 'default': None, 'samplesheet': False, 'output': False, 'required': False, 'description': 'Skip dupRadar.'})]
    skip_qualimap: typing_extensions.Annotated[typing.Optional[bool], FlyteAnnotation({'display_name': 'Skip Qualimap', 'default': None, 'samplesheet': False, 'output': False, 'required': False, 'description': 'Skip Qualimap.'})]
    skip_rseqc: typing_extensions.Annotated[typing.Optional[bool], FlyteAnnotation({'display_name': 'Skip Rseqc', 'default': None, 'samplesheet': False, 'output': False, 'required': False, 'description': 'Skip RSeQC.'})]
    skip_biotype_qc: typing_extensions.Annotated[typing.Optional[bool], FlyteAnnotation({'display_name': 'Skip Biotype Qc', 'default': None, 'samplesheet': False, 'output': False, 'required': False, 'description': 'Skip additional featureCounts process for biotype QC.'})]
    skip_deseq2_qc: typing_extensions.Annotated[typing.Optional[bool], FlyteAnnotation({'display_name': 'Skip Deseq2 Qc', 'default': None, 'samplesheet': False, 'output': False, 'required': False, 'description': 'Skip DESeq2 PCA and heatmap plotting.'})]
    skip_multiqc: typing_extensions.Annotated[typing.Optional[bool], FlyteAnnotation({'display_name': 'Skip Multiqc', 'default': None, 'samplesheet': False, 'output': False, 'required': False, 'description': 'Skip MultiQC.'})]
    skip_qc: typing_extensions.Annotated[typing.Optional[bool], FlyteAnnotation({'display_name': 'Skip Qc', 'default': None, 'samplesheet': False, 'output': False, 'required': False, 'description': 'Skip all QC steps except for MultiQC.'})]
    config_profile_name: typing_extensions.Annotated[typing.Optional[str], FlyteAnnotation({'display_name': 'Config Profile Name', 'default': None, 'samplesheet': False, 'output': False, 'required': False, 'description': 'Institutional config name.'})]
    config_profile_description: typing_extensions.Annotated[typing.Optional[str], FlyteAnnotation({'display_name': 'Config Profile Description', 'default': None, 'samplesheet': False, 'output': False, 'required': False, 'description': 'Institutional config description.'})]
    config_profile_contact: typing_extensions.Annotated[typing.Optional[str], FlyteAnnotation({'display_name': 'Config Profile Contact', 'default': None, 'samplesheet': False, 'output': False, 'required': False, 'description': 'Institutional config contact information.'})]
    config_profile_url: typing_extensions.Annotated[typing.Optional[str], FlyteAnnotation({'display_name': 'Config Profile Url', 'default': None, 'samplesheet': False, 'output': False, 'required': False, 'description': 'Institutional config URL link.'})]
    version: typing_extensions.Annotated[typing.Optional[bool], FlyteAnnotation({'display_name': 'Version', 'default': None, 'samplesheet': False, 'output': False, 'required': False, 'description': 'Display version and exit.'})]
    email_on_fail: typing_extensions.Annotated[typing.Optional[str], FlyteAnnotation({'display_name': 'Email On Fail', 'default': None, 'samplesheet': False, 'output': False, 'required': False, 'description': 'Email address for completion summary, only when pipeline fails.', 'help_text': 'Specify an email address to receive a summary report only when the pipeline fails to complete successfully.'})]
    plaintext_email: typing_extensions.Annotated[typing.Optional[bool], FlyteAnnotation({'display_name': 'Plaintext Email', 'default': None, 'samplesheet': False, 'output': False, 'required': False, 'description': 'Send plain-text email instead of HTML.'})]
    monochrome_logs: typing_extensions.Annotated[typing.Optional[bool], FlyteAnnotation({'display_name': 'Monochrome Logs', 'default': None, 'samplesheet': False, 'output': False, 'required': False, 'description': 'Do not use colored log outputs.'})]
    hook_url: typing_extensions.Annotated[typing.Optional[LPath], FlyteAnnotation({'display_name': 'Hook Url', 'default': None, 'samplesheet': False, 'output': False, 'required': False, 'description': 'Incoming Webhook URL for messaging service', 'help_text': 'URL for messaging service integration. Currently supports Microsoft Teams and Slack.'})]
    multiqc_config: typing_extensions.Annotated[typing.Optional[LatchFile], FlyteAnnotation({'display_name': 'Multiqc Config', 'default': None, 'samplesheet': False, 'output': False, 'required': False, 'description': 'Custom config file to supply to MultiQC.'})]
    multiqc_logo: typing_extensions.Annotated[typing.Optional[LatchFile], FlyteAnnotation({'display_name': 'Multiqc Logo', 'default': None, 'samplesheet': False, 'output': False, 'required': False, 'description': 'Custom logo file to supply to MultiQC. File name must also be set in the MultiQC config file.'})]
    multiqc_methods_description: typing_extensions.Annotated[typing.Optional[LatchFile], FlyteAnnotation({'display_name': 'Multiqc Methods Description', 'default': None, 'samplesheet': False, 'output': False, 'required': False, 'description': 'Custom MultiQC yaml file containing HTML including a methods description.'})]
    trace_report_suffix: typing_extensions.Annotated[typing.Optional[str], FlyteAnnotation({'display_name': 'Trace Report Suffix', 'default': None, 'samplesheet': False, 'output': False, 'required': False, 'description': 'Suffix to add to the trace report filename.', 'help_text': "You can use '{date}' as a placeholder which will be replaced with the current date and time in the format 'yyyy-MM-dd_HH-mm-ss'. For example, 'run_{date}' will become 'run_2023-05-15_14-30-45'.", 'errorMessage': 'The trace report suffix must only contain alphanumeric characters, underscores, hyphens, dots, and curly braces for date placeholders.'})]
    hisat2_build_memory: typing_extensions.Annotated[typing.Optional[str], FlyteAnnotation({'display_name': 'Hisat2 Build Memory', 'default': {'scalar': {'union': {'value': {'scalar': {'primitive': {'stringValue': '200.GB'}}}, 'type': {'simple': 'STRING', 'structure': {'tag': 'str'}}}}}, 'samplesheet': False, 'output': False, 'required': False, 'description': 'Minimum memory required to use splice sites and exons in the HISAT2 index build process.', 'help_text': 'HISAT2 requires significant RAM to build genome indices for large genomes with splice sites and exons (human genome typically needs 200GB). If you provide less memory than this threshold, splice sites and exons will be ignored, reducing memory requirements. For small genomes, set a lower value; for larger genomes, provide more memory.', 'errorMessage': "Memory format must be a valid string like '200.GB', '16.MB', '8KB'."})] = field(default='200.GB')
    gtf_extra_attributes: typing_extensions.Annotated[typing.Optional[str], FlyteAnnotation({'display_name': 'Gtf Extra Attributes', 'default': {'scalar': {'union': {'value': {'scalar': {'primitive': {'stringValue': 'gene_name'}}}, 'type': {'simple': 'STRING', 'structure': {'tag': 'str'}}}}}, 'samplesheet': False, 'output': False, 'required': False, 'description': 'By default, the pipeline uses the `gene_name` field to obtain additional gene identifiers from the input GTF file when running Salmon.', 'help_text': 'Modify this parameter to change which attributes are extracted from the GTF file when running Salmon. You can specify multiple values separated by commas (e.g., `--gtf_extra_attributes gene_id,transcript_id`).'})] = field(default='gene_name')
    gtf_group_features: typing_extensions.Annotated[typing.Optional[str], FlyteAnnotation({'display_name': 'Gtf Group Features', 'default': {'scalar': {'union': {'value': {'scalar': {'primitive': {'stringValue': 'gene_id'}}}, 'type': {'simple': 'STRING', 'structure': {'tag': 'str'}}}}}, 'samplesheet': False, 'output': False, 'required': False, 'description': 'Define the attribute type used to group features in the GTF file when running Salmon.'})] = field(default='gene_id')
    featurecounts_group_type: typing_extensions.Annotated[typing.Optional[str], FlyteAnnotation({'display_name': 'Featurecounts Group Type', 'default': {'scalar': {'union': {'value': {'scalar': {'primitive': {'stringValue': 'gene_biotype'}}}, 'type': {'simple': 'STRING', 'structure': {'tag': 'str'}}}}}, 'samplesheet': False, 'output': False, 'required': False, 'description': 'The attribute type used to group feature types in the GTF file when generating the biotype plot with featureCounts.'})] = field(default='gene_biotype')
    featurecounts_feature_type: typing_extensions.Annotated[typing.Optional[str], FlyteAnnotation({'display_name': 'Featurecounts Feature Type', 'default': {'scalar': {'union': {'value': {'scalar': {'primitive': {'stringValue': 'exon'}}}, 'type': {'simple': 'STRING', 'structure': {'tag': 'str'}}}}}, 'samplesheet': False, 'output': False, 'required': False, 'description': "By default, the pipeline assigns reads based on the 'exon' attribute within the GTF file.", 'help_text': 'Specifies the feature type from the GTF file to use when generating the biotype plot with featureCounts.'})] = field(default='exon')
    igenomes_base: typing_extensions.Annotated[typing.Optional[LatchDir], FlyteAnnotation({'display_name': 'Igenomes Base', 'default': {'scalar': {'union': {'value': {'scalar': {'blob': {'metadata': {'type': {'dimensionality': 'MULTIPART'}}, 'uri': 's3://ngi-igenomes/igenomes/'}}}, 'type': {'blob': {'dimensionality': 'MULTIPART'}, 'structure': {'tag': 'LatchDirPath'}}}}}, 'samplesheet': False, 'output': False, 'required': False, 'description': 'The base path to the igenomes reference files'})] = field(default_factory=lambda: LatchDir('s3://ngi-igenomes/igenomes/', remote_path='s3://ngi-igenomes/igenomes/'))
    trimmer: typing_extensions.Annotated[typing.Optional[TrimmerType], FlyteAnnotation({'display_name': 'Trimmer', 'default': {'scalar': {'union': {'value': {'scalar': {'primitive': {'stringValue': 'trimgalore'}}}, 'type': {'enumType': {'values': ['trimgalore', 'fastp']}, 'structure': {'tag': 'DefaultEnumTransformer'}}}}}, 'samplesheet': False, 'output': False, 'required': False, 'description': "Specifies the trimming tool to use - available options are 'trimgalore' and 'fastp'."})] = field(default=TrimmerType.trimgalore)
    min_trimmed_reads: typing_extensions.Annotated[typing.Optional[int], FlyteAnnotation({'display_name': 'Min Trimmed Reads', 'default': {'scalar': {'union': {'value': {'scalar': {'primitive': {'integer': '10000'}}}, 'type': {'simple': 'INTEGER', 'structure': {'tag': 'int'}}}}}, 'samplesheet': False, 'output': False, 'required': False, 'description': 'Minimum number of trimmed reads below which samples are removed from further processing. Some downstream steps in the pipeline will fail if this threshold is too low.'})] = field(default=10000)
    ribo_database_manifest: typing_extensions.Annotated[typing.Optional[LatchFile], FlyteAnnotation({'display_name': 'Ribo Database Manifest', 'default': {'scalar': {'union': {'value': {'scalar': {'blob': {'metadata': {'type': {}}}}}, 'type': {'blob': {}, 'structure': {'tag': 'LatchFilePath'}}}}}, 'samplesheet': False, 'output': False, 'required': False, 'description': 'Text file containing paths to fasta files (one per line) that will be used to create the database for SortMeRNA.', 'help_text': 'By default, [rRNA databases](https://github.com/biocore/sortmerna/tree/master/data/rRNA_databases) from the SortMeRNA GitHub repository are used. See the example in `assets/rrna-default-dbs.txt`. Note: commercial/non-academic entities require [SILVA licensing](https://www.arb-silva.de/silva-license-information) for these databases.'})] = field(default_factory=lambda: LatchFile('${projectDir}/workflows/rnaseq/assets/rrna-db-defaults.txt'))
    umi_dedup_tool: typing_extensions.Annotated[typing.Optional[UmiDedupToolType], FlyteAnnotation({'display_name': 'Umi Dedup Tool', 'default': {'scalar': {'union': {'value': {'scalar': {'primitive': {'stringValue': 'umitools'}}}, 'type': {'enumType': {'values': ['umitools', 'umicollapse']}, 'structure': {'tag': 'DefaultEnumTransformer'}}}}}, 'samplesheet': False, 'output': False, 'required': False, 'description': "Specifies the tool to use for UMI deduplication - available options are 'umitools' and 'umicollapse'."})] = field(default=UmiDedupToolType.umitools)
    umitools_extract_method: typing_extensions.Annotated[typing.Optional[str], FlyteAnnotation({'display_name': 'Umitools Extract Method', 'default': {'scalar': {'union': {'value': {'scalar': {'primitive': {'stringValue': 'string'}}}, 'type': {'simple': 'STRING', 'structure': {'tag': 'str'}}}}}, 'samplesheet': False, 'output': False, 'required': False, 'description': "UMI pattern to use. Can be either 'string' (default) or 'regex'.", 'help_text': 'Detailed information can be found in the [UMI-tools documentation](https://umi-tools.readthedocs.io/en/latest/reference/extract.html#extract-method).'})] = field(default='string')
    umitools_grouping_method: typing_extensions.Annotated[typing.Optional[UmitoolsGroupingMethodType], FlyteAnnotation({'display_name': 'Umitools Grouping Method', 'default': {'scalar': {'union': {'value': {'scalar': {'primitive': {'stringValue': 'directional'}}}, 'type': {'enumType': {'values': ['unique', 'percentile', 'cluster', 'adjacency', 'directional']}, 'structure': {'tag': 'DefaultEnumTransformer'}}}}}, 'samplesheet': False, 'output': False, 'required': False, 'description': 'Method to use to determine read groups by subsuming those with similar UMIs. All methods start by identifying the reads with the same mapping position, but treat similar yet nonidentical UMIs differently.'})] = field(default=UmitoolsGroupingMethodType.directional)
    aligner: typing_extensions.Annotated[typing.Optional[AlignerType], FlyteAnnotation({'display_name': 'Aligner', 'default': {'scalar': {'union': {'value': {'scalar': {'primitive': {'stringValue': 'star_salmon'}}}, 'type': {'enumType': {'values': ['star_salmon', 'star_rsem', 'hisat2']}, 'structure': {'tag': 'DefaultEnumTransformer'}}}}}, 'samplesheet': False, 'output': False, 'required': False, 'description': "Specifies the alignment algorithm to use - available options are 'star_salmon', 'star_rsem' and 'hisat2'."})] = field(default=AlignerType.star_salmon)
    pseudo_aligner_kmer_size: typing_extensions.Annotated[typing.Optional[int], FlyteAnnotation({'display_name': 'Pseudo Aligner Kmer Size', 'default': {'scalar': {'union': {'value': {'scalar': {'primitive': {'integer': '31'}}}, 'type': {'simple': 'INTEGER', 'structure': {'tag': 'int'}}}}}, 'samplesheet': False, 'output': False, 'required': False, 'description': 'Kmer length passed to indexing step of pseudo-aligners', 'help_text': 'Setting an appropriate kmer size is crucial for quantification with Kallisto or Salmon. This is particularly important for short reads (<50bp), where the default size of 31 can cause problems.'})] = field(default=31)
    min_mapped_reads: typing_extensions.Annotated[typing.Optional[float], FlyteAnnotation({'display_name': 'Min Mapped Reads', 'default': {'scalar': {'union': {'value': {'scalar': {'primitive': {'floatValue': 5.0}}}, 'type': {'simple': 'FLOAT', 'structure': {'tag': 'float'}}}}}, 'samplesheet': False, 'output': False, 'required': False, 'description': 'Minimum percentage of uniquely mapped reads below which samples are removed from further processing.', 'help_text': 'Downstream pipeline steps may fail if this threshold is set too low.'})] = field(default=5.0)
    kallisto_quant_fraglen: typing_extensions.Annotated[typing.Optional[int], FlyteAnnotation({'display_name': 'Kallisto Quant Fraglen', 'default': {'scalar': {'union': {'value': {'scalar': {'primitive': {'integer': '200'}}}, 'type': {'simple': 'INTEGER', 'structure': {'tag': 'int'}}}}}, 'samplesheet': False, 'output': False, 'required': False, 'description': 'In single-end mode Kallisto requires an estimated fragment length. Specify a default value for that here. TODO: use existing RSeQC results to do this dynamically.'})] = field(default=200)
    kallisto_quant_fraglen_sd: typing_extensions.Annotated[typing.Optional[int], FlyteAnnotation({'display_name': 'Kallisto Quant Fraglen Sd', 'default': {'scalar': {'union': {'value': {'scalar': {'primitive': {'integer': '200'}}}, 'type': {'simple': 'INTEGER', 'structure': {'tag': 'int'}}}}}, 'samplesheet': False, 'output': False, 'required': False, 'description': 'In single-end mode, Kallisto requires an estimated standard error for fragment length. Specify a default value for that here. TODO: use existing RSeQC results to do this dynamically.'})] = field(default=200)
    stranded_threshold: typing_extensions.Annotated[typing.Optional[float], FlyteAnnotation({'display_name': 'Stranded Threshold', 'default': {'scalar': {'union': {'value': {'scalar': {'primitive': {'floatValue': 0.8}}}, 'type': {'simple': 'FLOAT', 'structure': {'tag': 'float'}}}}}, 'samplesheet': False, 'output': False, 'required': False, 'description': 'The fraction of stranded reads that must be assigned to a strandedness for confident assignment. Must be at least 0.5.'})] = field(default=0.8)
    unstranded_threshold: typing_extensions.Annotated[typing.Optional[float], FlyteAnnotation({'display_name': 'Unstranded Threshold', 'default': {'scalar': {'union': {'value': {'scalar': {'primitive': {'floatValue': 0.1}}}, 'type': {'simple': 'FLOAT', 'structure': {'tag': 'float'}}}}}, 'samplesheet': False, 'output': False, 'required': False, 'description': "The difference in fraction of stranded reads assigned to 'forward' and 'reverse' below which a sample is classified as 'unstranded'. By default the forward and reverse fractions must differ by less than 0.1 for the sample to be called as unstranded."})] = field(default=0.1)
    extra_fqlint_args: typing_extensions.Annotated[typing.Optional[str], FlyteAnnotation({'display_name': 'Extra Fqlint Args', 'default': {'scalar': {'union': {'value': {'scalar': {'primitive': {'stringValue': '--disable-validator P001'}}}, 'type': {'simple': 'STRING', 'structure': {'tag': 'str'}}}}}, 'samplesheet': False, 'output': False, 'required': False, 'description': 'Extra arguments to pass to the fq lint command.'})] = field(default='--disable-validator P001')
    deseq2_vst: typing_extensions.Annotated[typing.Optional[bool], FlyteAnnotation({'display_name': 'Deseq2 Vst', 'default': {'scalar': {'union': {'value': {'scalar': {'primitive': {'boolean': True}}}, 'type': {'simple': 'BOOLEAN', 'structure': {'tag': 'bool'}}}}}, 'samplesheet': False, 'output': False, 'required': False, 'description': 'Use vst transformation instead of rlog with DESeq2.', 'help_text': 'See the [DESeq2 documentation](http://bioconductor.org/packages/devel/bioc/vignettes/DESeq2/inst/doc/DESeq2.html#data-transformations-and-visualization) for details on transformations.'})] = field(default=True)
    rseqc_modules: typing_extensions.Annotated[typing.Optional[str], FlyteAnnotation({'display_name': 'Rseqc Modules', 'default': {'scalar': {'union': {'value': {'scalar': {'primitive': {'stringValue': 'bam_stat,inner_distance,infer_experiment,junction_annotation,junction_saturation,read_distribution,read_duplication'}}}, 'type': {'simple': 'STRING', 'structure': {'tag': 'str'}}}}}, 'samplesheet': False, 'output': False, 'required': False, 'description': 'Comma-separated list of RSeQC modules to run.', 'help_text': 'Available modules include: bam_stat, inner_distance, infer_experiment, junction_annotation, junction_saturation, read_distribution, read_duplication.', 'errorMessage': 'The RSeQC modules must be a comma-separated list of valid module names.'})] = field(default='bam_stat,inner_distance,infer_experiment,junction_annotation,junction_saturation,read_distribution,read_duplication')
    bracken_precision: typing_extensions.Annotated[typing.Optional[BrackenPrecisionType], FlyteAnnotation({'display_name': 'Bracken Precision', 'default': {'scalar': {'union': {'value': {'scalar': {'primitive': {'stringValue': 'S'}}}, 'type': {'enumType': {'values': ['D', 'P', 'C', 'O', 'F', 'G', 'S']}, 'structure': {'tag': 'DefaultEnumTransformer'}}}}}, 'samplesheet': False, 'output': False, 'required': False, 'description': 'Taxonomic level for Bracken abundance estimations.', 'help_text': 'Use the first letter of taxonomic levels: Domain, Phylum, Class, Order, Family, Genus, or Species.'})] = field(default=BrackenPrecisionType.S)
    skip_bbsplit: typing_extensions.Annotated[typing.Optional[bool], FlyteAnnotation({'display_name': 'Skip Bbsplit', 'default': {'scalar': {'union': {'value': {'scalar': {'primitive': {'boolean': True}}}, 'type': {'simple': 'BOOLEAN', 'structure': {'tag': 'bool'}}}}}, 'samplesheet': False, 'output': False, 'required': False, 'description': 'Skip BBSplit for removal of non-reference genome reads.'})] = field(default=True)
    skip_preseq: typing_extensions.Annotated[typing.Optional[bool], FlyteAnnotation({'display_name': 'Skip Preseq', 'default': {'scalar': {'union': {'value': {'scalar': {'primitive': {'boolean': True}}}, 'type': {'simple': 'BOOLEAN', 'structure': {'tag': 'bool'}}}}}, 'samplesheet': False, 'output': False, 'required': False, 'description': 'Skip Preseq.'})] = field(default=True)
    custom_config_version: typing_extensions.Annotated[typing.Optional[str], FlyteAnnotation({'display_name': 'Custom Config Version', 'default': {'scalar': {'union': {'value': {'scalar': {'primitive': {'stringValue': 'master'}}}, 'type': {'simple': 'STRING', 'structure': {'tag': 'str'}}}}}, 'samplesheet': False, 'output': False, 'required': False, 'description': 'Git commit id for Institutional configs.'})] = field(default='master')
    custom_config_base: typing_extensions.Annotated[typing.Optional[str], FlyteAnnotation({'display_name': 'Custom Config Base', 'default': {'scalar': {'union': {'value': {'scalar': {'primitive': {'stringValue': 'https://raw.githubusercontent.com/nf-core/configs/master'}}}, 'type': {'simple': 'STRING', 'structure': {'tag': 'str'}}}}}, 'samplesheet': False, 'output': False, 'required': False, 'description': 'Base directory for Institutional configs.', 'help_text': 'When running offline, Nextflow cannot retrieve institutional configuration files from the internet. If needed, download these files from the repository and specify their location with this parameter.'})] = field(default='https://raw.githubusercontent.com/nf-core/configs/master')
    publish_dir_mode: typing_extensions.Annotated[typing.Optional[PublishDirModeType], FlyteAnnotation({'display_name': 'Publish Dir Mode', 'default': {'scalar': {'union': {'value': {'scalar': {'primitive': {'stringValue': 'copy'}}}, 'type': {'enumType': {'values': ['symlink', 'rellink', 'link', 'copy', 'copyNoFollow', 'move']}, 'structure': {'tag': 'DefaultEnumTransformer'}}}}}, 'samplesheet': False, 'output': False, 'required': False, 'description': 'Method used to save pipeline results to output directory.', 'help_text': "Controls how files are saved to the output directory through Nextflow's `publishDir` directive. See the [Nextflow documentation](https://www.nextflow.io/docs/latest/process.html#publishdir) for available options."})] = field(default=PublishDirModeType.copy)
    max_multiqc_email_size: typing_extensions.Annotated[typing.Optional[str], FlyteAnnotation({'display_name': 'Max Multiqc Email Size', 'default': {'scalar': {'union': {'value': {'scalar': {'primitive': {'stringValue': '25.MB'}}}, 'type': {'simple': 'STRING', 'structure': {'tag': 'str'}}}}}, 'samplesheet': False, 'output': False, 'required': False, 'description': 'File size limit when attaching MultiQC reports to summary emails.'})] = field(default='25.MB')
    validate_params: typing_extensions.Annotated[typing.Optional[bool], FlyteAnnotation({'display_name': 'Validate Params', 'default': {'scalar': {'union': {'value': {'scalar': {'primitive': {'boolean': True}}}, 'type': {'simple': 'BOOLEAN', 'structure': {'tag': 'bool'}}}}}, 'samplesheet': False, 'output': False, 'required': False, 'description': 'Boolean indicating whether to validate parameters against the schema at runtime'})] = field(default=True)
    pipelines_testdata_base_path: typing_extensions.Annotated[typing.Optional[LatchDir], FlyteAnnotation({'display_name': 'Pipelines Testdata Base Path', 'default': {'scalar': {'union': {'value': {'scalar': {'blob': {'metadata': {'type': {'dimensionality': 'MULTIPART'}}}}}, 'type': {'blob': {'dimensionality': 'MULTIPART'}, 'structure': {'tag': 'LatchDirPath'}}}}}, 'samplesheet': False, 'output': False, 'required': False, 'description': 'Base URL or local path to location of pipeline test dataset files'})] = field(default_factory=lambda: LatchDir('https://raw.githubusercontent.com/nf-core/test-datasets/7f1614baeb0ddf66e60be78c3d9fa55440465ac8/'))


generated_flow = [Section('Input/output options', Text('Define where the pipeline should find input data and save output data.'), Params('input', 'outdir'), Spoiler('Optional Parameters', Params('email', 'multiqc_title'))), Spoiler('Reference genome options', Text('Reference genome related files and options required for the workflow.'), Params('genome', 'fasta', 'gtf', 'gff', 'gene_bed', 'transcript_fasta', 'additional_fasta', 'splicesites', 'star_index', 'hisat2_index', 'rsem_index', 'salmon_index', 'kallisto_index', 'hisat2_build_memory', 'gencode', 'gtf_extra_attributes', 'gtf_group_features', 'featurecounts_group_type', 'featurecounts_feature_type', 'igenomes_ignore', 'igenomes_base')), Spoiler('Read trimming options', Text('Options to adjust read trimming criteria.'), Params('trimmer', 'extra_trimgalore_args', 'extra_fastp_args', 'min_trimmed_reads')), Spoiler('Read filtering options', Text('Options for filtering reads prior to alignment'), Params('bbsplit_fasta_list', 'bbsplit_index', 'sortmerna_index', 'remove_ribo_rna', 'ribo_database_manifest')), Spoiler('UMI options', Text('Options for processing reads with unique molecular identifiers'), Params('with_umi', 'umi_dedup_tool', 'umitools_extract_method', 'umitools_bc_pattern', 'umitools_bc_pattern2', 'umi_discard_read', 'umitools_umi_separator', 'umitools_grouping_method', 'umitools_dedup_stats')), Spoiler('Alignment options', Text('Options to adjust parameters and filtering criteria for read alignments.'), Params('aligner', 'use_sentieon_star', 'pseudo_aligner', 'pseudo_aligner_kmer_size', 'bam_csi_index', 'star_ignore_sjdbgtf', 'salmon_quant_libtype', 'min_mapped_reads', 'seq_center', 'stringtie_ignore_gtf', 'extra_star_align_args', 'extra_salmon_quant_args', 'extra_kallisto_quant_args', 'kallisto_quant_fraglen', 'kallisto_quant_fraglen_sd', 'stranded_threshold', 'unstranded_threshold')), Spoiler('Optional outputs', Text('Additional output files produced as intermediates that can be saved'), Params('save_merged_fastq', 'save_umi_intermeds', 'save_non_ribo_reads', 'save_bbsplit_reads', 'save_reference', 'save_trimmed', 'save_align_intermeds', 'save_unaligned', 'save_kraken_assignments', 'save_kraken_unassigned')), Spoiler('Quality Control', Text('Additional quality control options.'), Params('extra_fqlint_args', 'deseq2_vst', 'rseqc_modules', 'contaminant_screening', 'kraken_db', 'bracken_precision')), Spoiler('Process skipping options', Text('Options to skip various steps within the workflow.'), Params('skip_gtf_filter', 'skip_gtf_transcript_filter', 'skip_bbsplit', 'skip_umi_extract', 'skip_linting', 'skip_trimming', 'skip_alignment', 'skip_pseudo_alignment', 'skip_markduplicates', 'skip_bigwig', 'skip_stringtie', 'skip_fastqc', 'skip_preseq', 'skip_dupradar', 'skip_qualimap', 'skip_rseqc', 'skip_biotype_qc', 'skip_deseq2_qc', 'skip_multiqc', 'skip_qc')), Spoiler('Institutional config options', Text('Parameters used to describe centralized config profiles. These should not be edited.'), Params('custom_config_version', 'custom_config_base', 'config_profile_name', 'config_profile_description', 'config_profile_contact', 'config_profile_url')), Spoiler('Generic options', Text('Less common options for the pipeline, typically set in a config file.'), Params('version', 'publish_dir_mode', 'email_on_fail', 'plaintext_email', 'max_multiqc_email_size', 'monochrome_logs', 'hook_url', 'multiqc_config', 'multiqc_logo', 'multiqc_methods_description', 'validate_params', 'pipelines_testdata_base_path', 'trace_report_suffix'))]
generated_flow parameter that organizes parameters using Section (visible groupings) and Spoiler (collapsible sections) to reduce visual clutter and help users focus on essential parameters while keeping advanced options accessible.
latch_metadata/__init__.py
latch_metadata/__init__.py
from dataclasses import dataclass

from latch.types.metadata import (
    LatchAuthor,
    NextflowMetadata,
    NextflowParameter,
    NextflowRuntimeResources
)
from latch.types.directory import LatchDir

from .generated import NextflowSchemaArgsType, generated_flow


@dataclass
class WorkflowArgsType(NextflowSchemaArgsType):
    # add any custom parameters here
    ...


NextflowMetadata(
    display_name='nf-core/rnaseq',
    author=LatchAuthor(
        name="Your Name",
    ),
    parameters={
        "args": NextflowParameter(type=WorkflowArgsType)
    },
    runtime_resources=NextflowRuntimeResources(
        cpus=4,
        memory=8,
        storage_gib=100,
    ),
    log_dir=LatchDir("latch:///your_log_dir"),
    flow=generated_flow,
)
NextflowMetadata object, which contains relevant fields for the workflow:
-
display_name: The display name of the workflow, as it will appear on the Latch UI. -
author: Name of the person or organization that publishes the workflow -
parameters: Input parameters to the workflow, defined asNextflowParameterobjects. This will contain a single entry for theWorkflowArgsTypedataclass, and should not be modified. -
runtime_resources: The resources the Nextflow Runtime requires to execute the workflow. Thestorage_gibfield will configure the storage size in GiB for the shared filesystem. -
log_dir: Latch directory to dump.nextflow.logfile on workflow failure.
Overwriting behavior
When re-running thegenerate-metadata command, the __init__.py file will not be touched and the generated.py file will be overwritten. Any changes should be made to __init__.py so that they can persist across generate-metadata calls.
Step 3: Register the workflow
To register a Nextflow pipeline on Latch, type:latch login
latch register . --nf-script main.nf --nf-execution-profile docker,test
-
latch register .: Searches for a Latch workflow in the current directory and registers it to Latch. -
--nf-script main.nf: Specifies the Nextflow script passed to the Nextflow command at runtime. For this workflow:nextflow run main.nf -
--nf-execution-profile docker,test: Defines the execution profile to use when running the workflow on Latch. We specify thedockerconfiguration profile to execute processes in a containerized environment.
latch.config- a Nextflow configuration file passed to Nextflow via the-configflag.wf/entrypoint.py- the generated Latch SDK workflow code that executes the Nextflow pipeline.
latch register command. This will take you to an interface like the one below:
As a part of the registration process, we build a docker image which is specified in a
Dockerfile. Normally this Dockerfile is autogenerated and stored in .latch, but if there is already a Dockerfile in the workflow directory prior to registering, it will be used to build this image. This can result in errors down the line if the Dockerfile is not generated by Latch.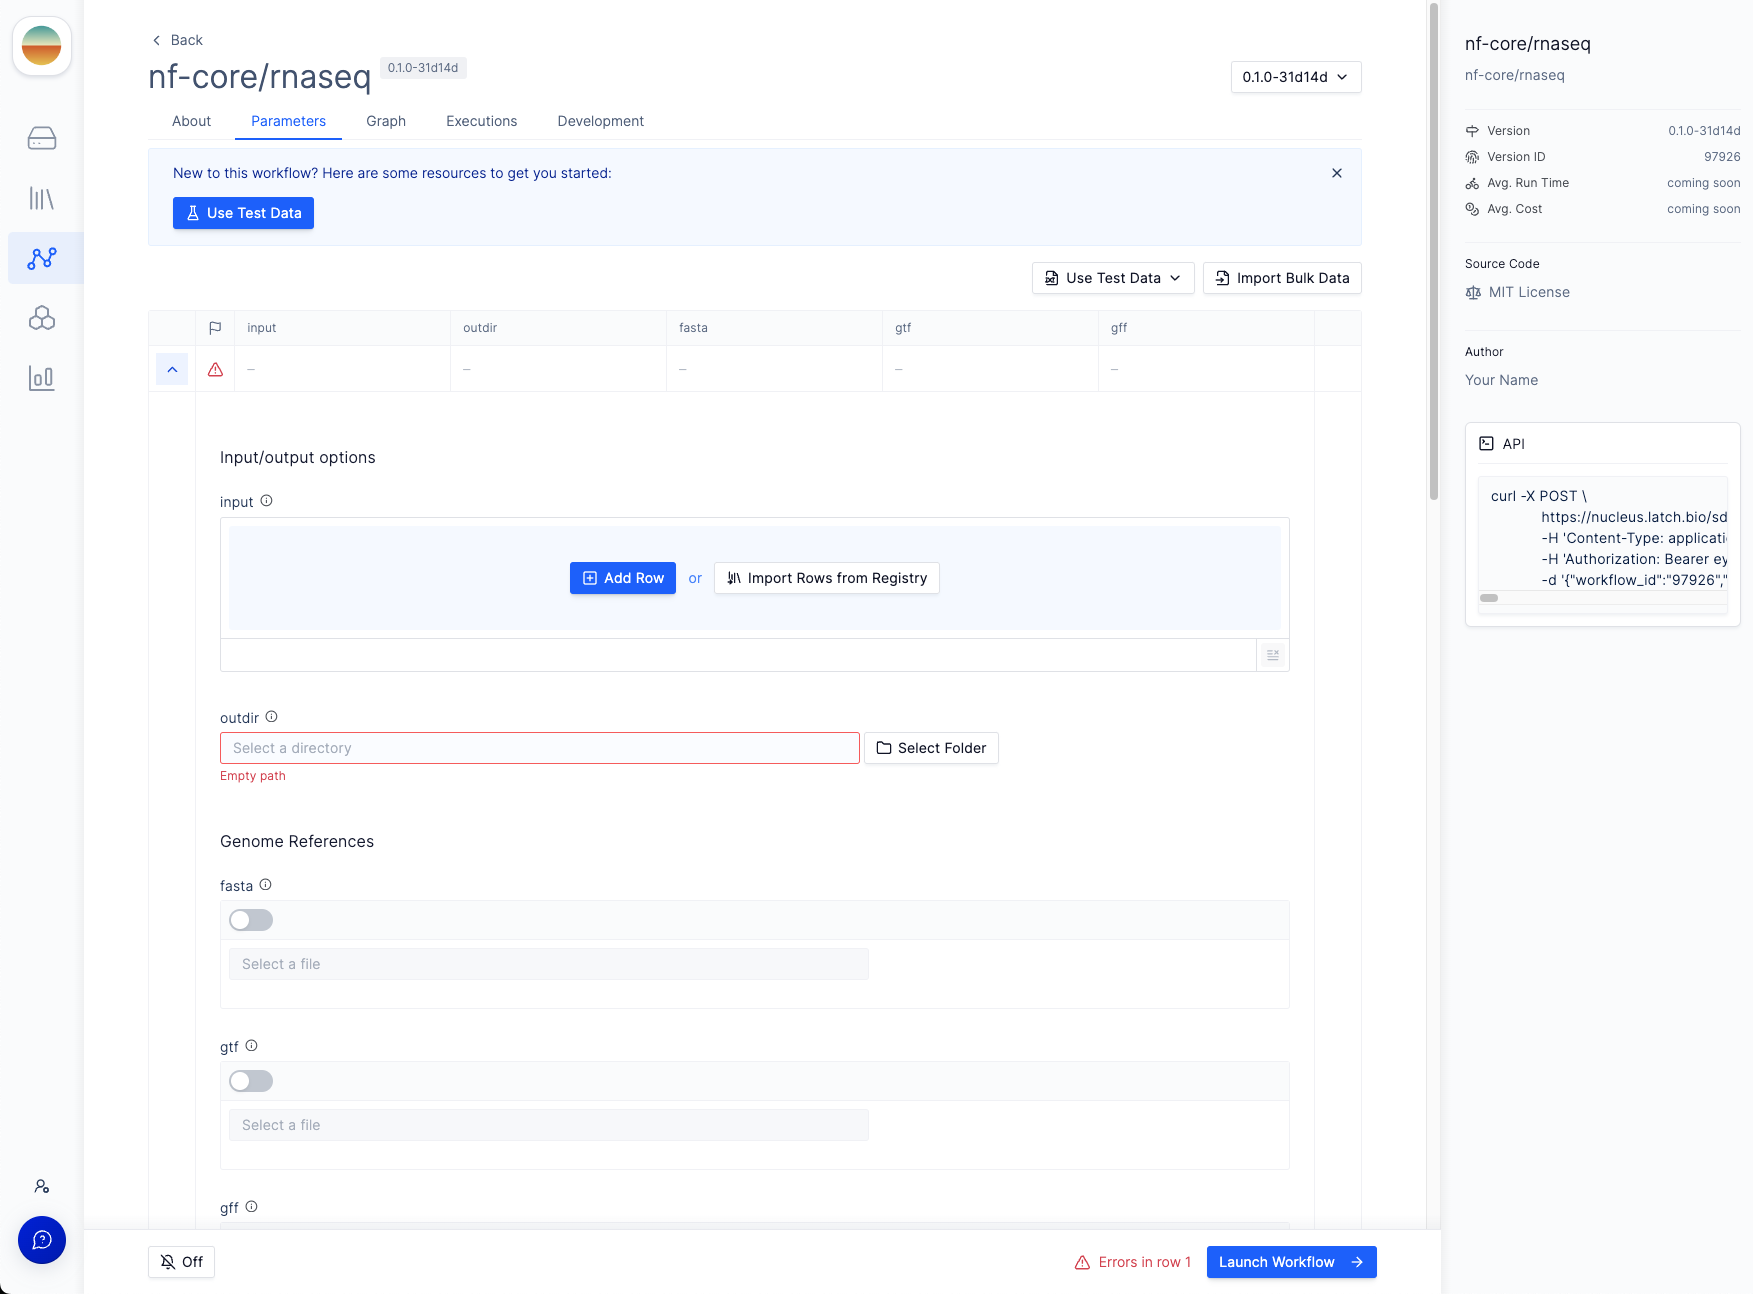
Step 4: Execute the workflow
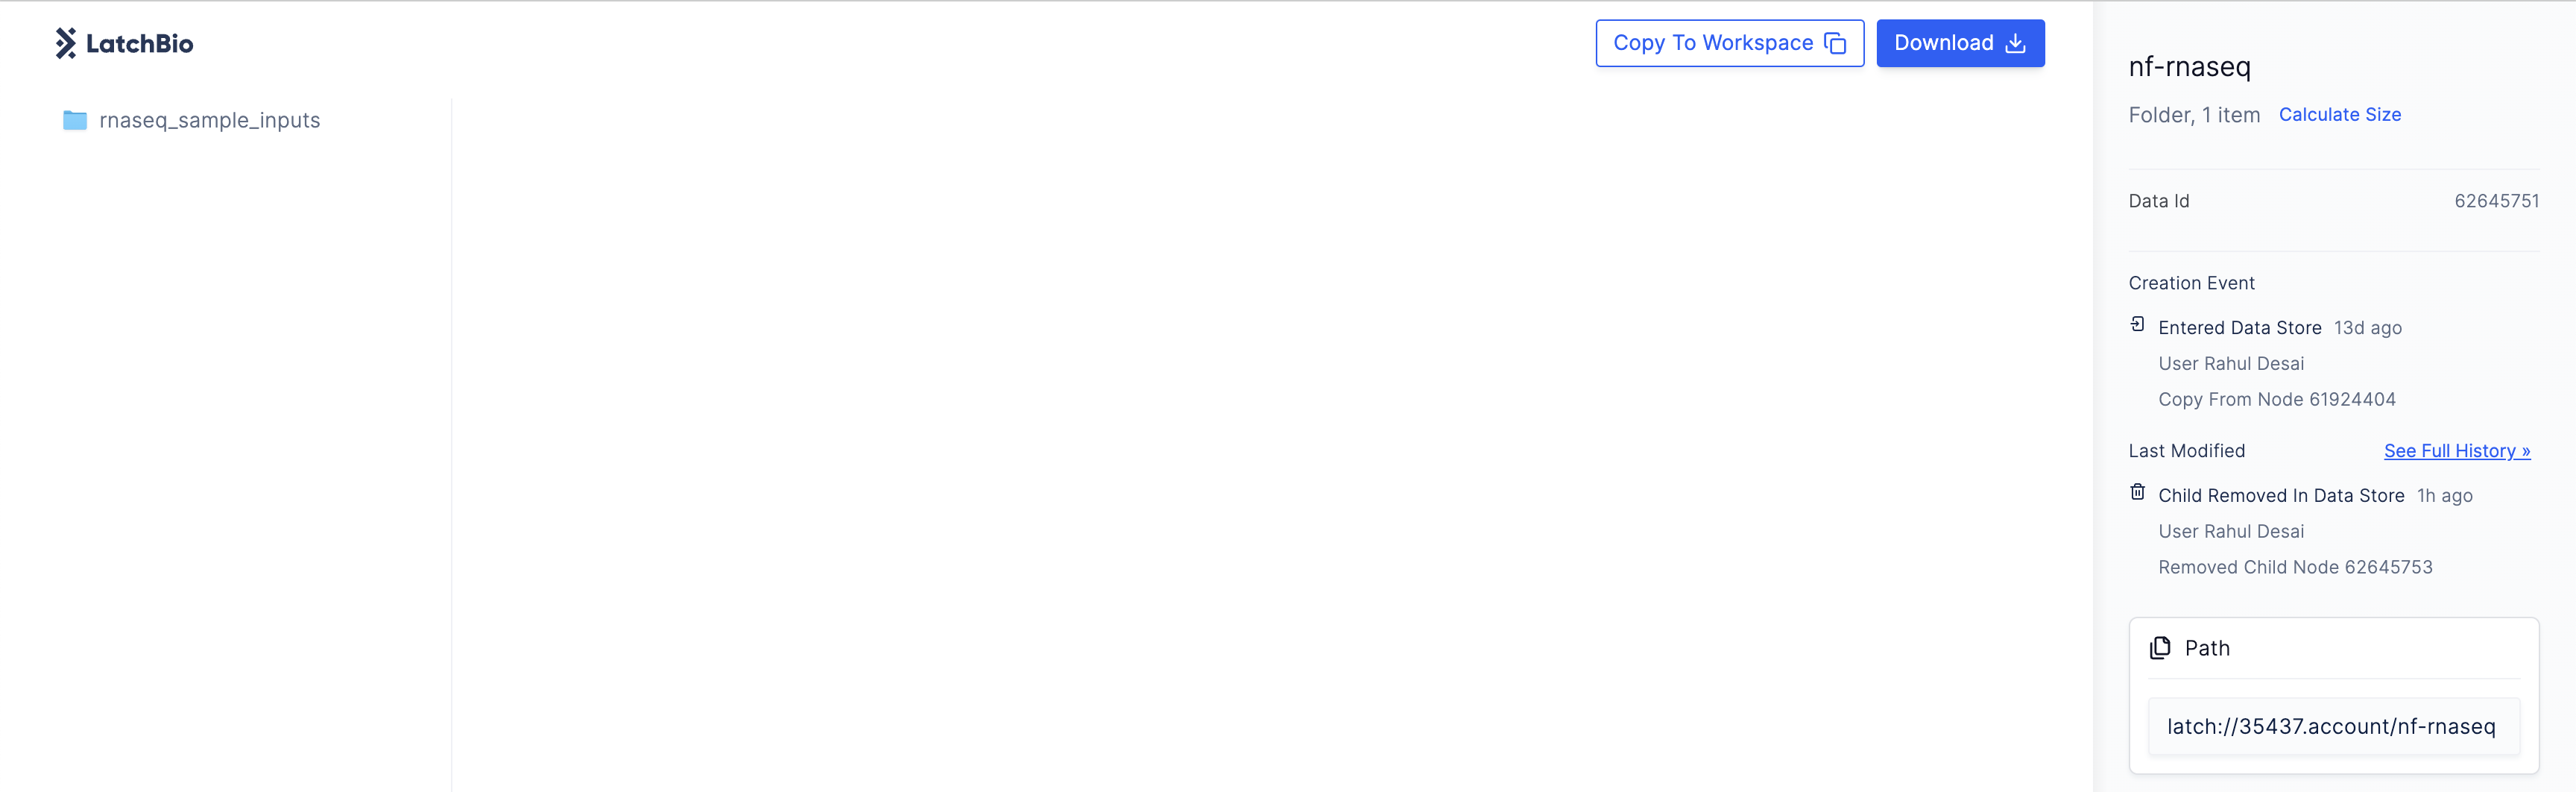
Before executing the workflow, we need to upload test data to Latch. You can find sample test data here. Copy the test data to your Latch workspace by clicking theCopy to Workspace button in the top right corner.
- Navigate to the Latch Registry and create a new Table.
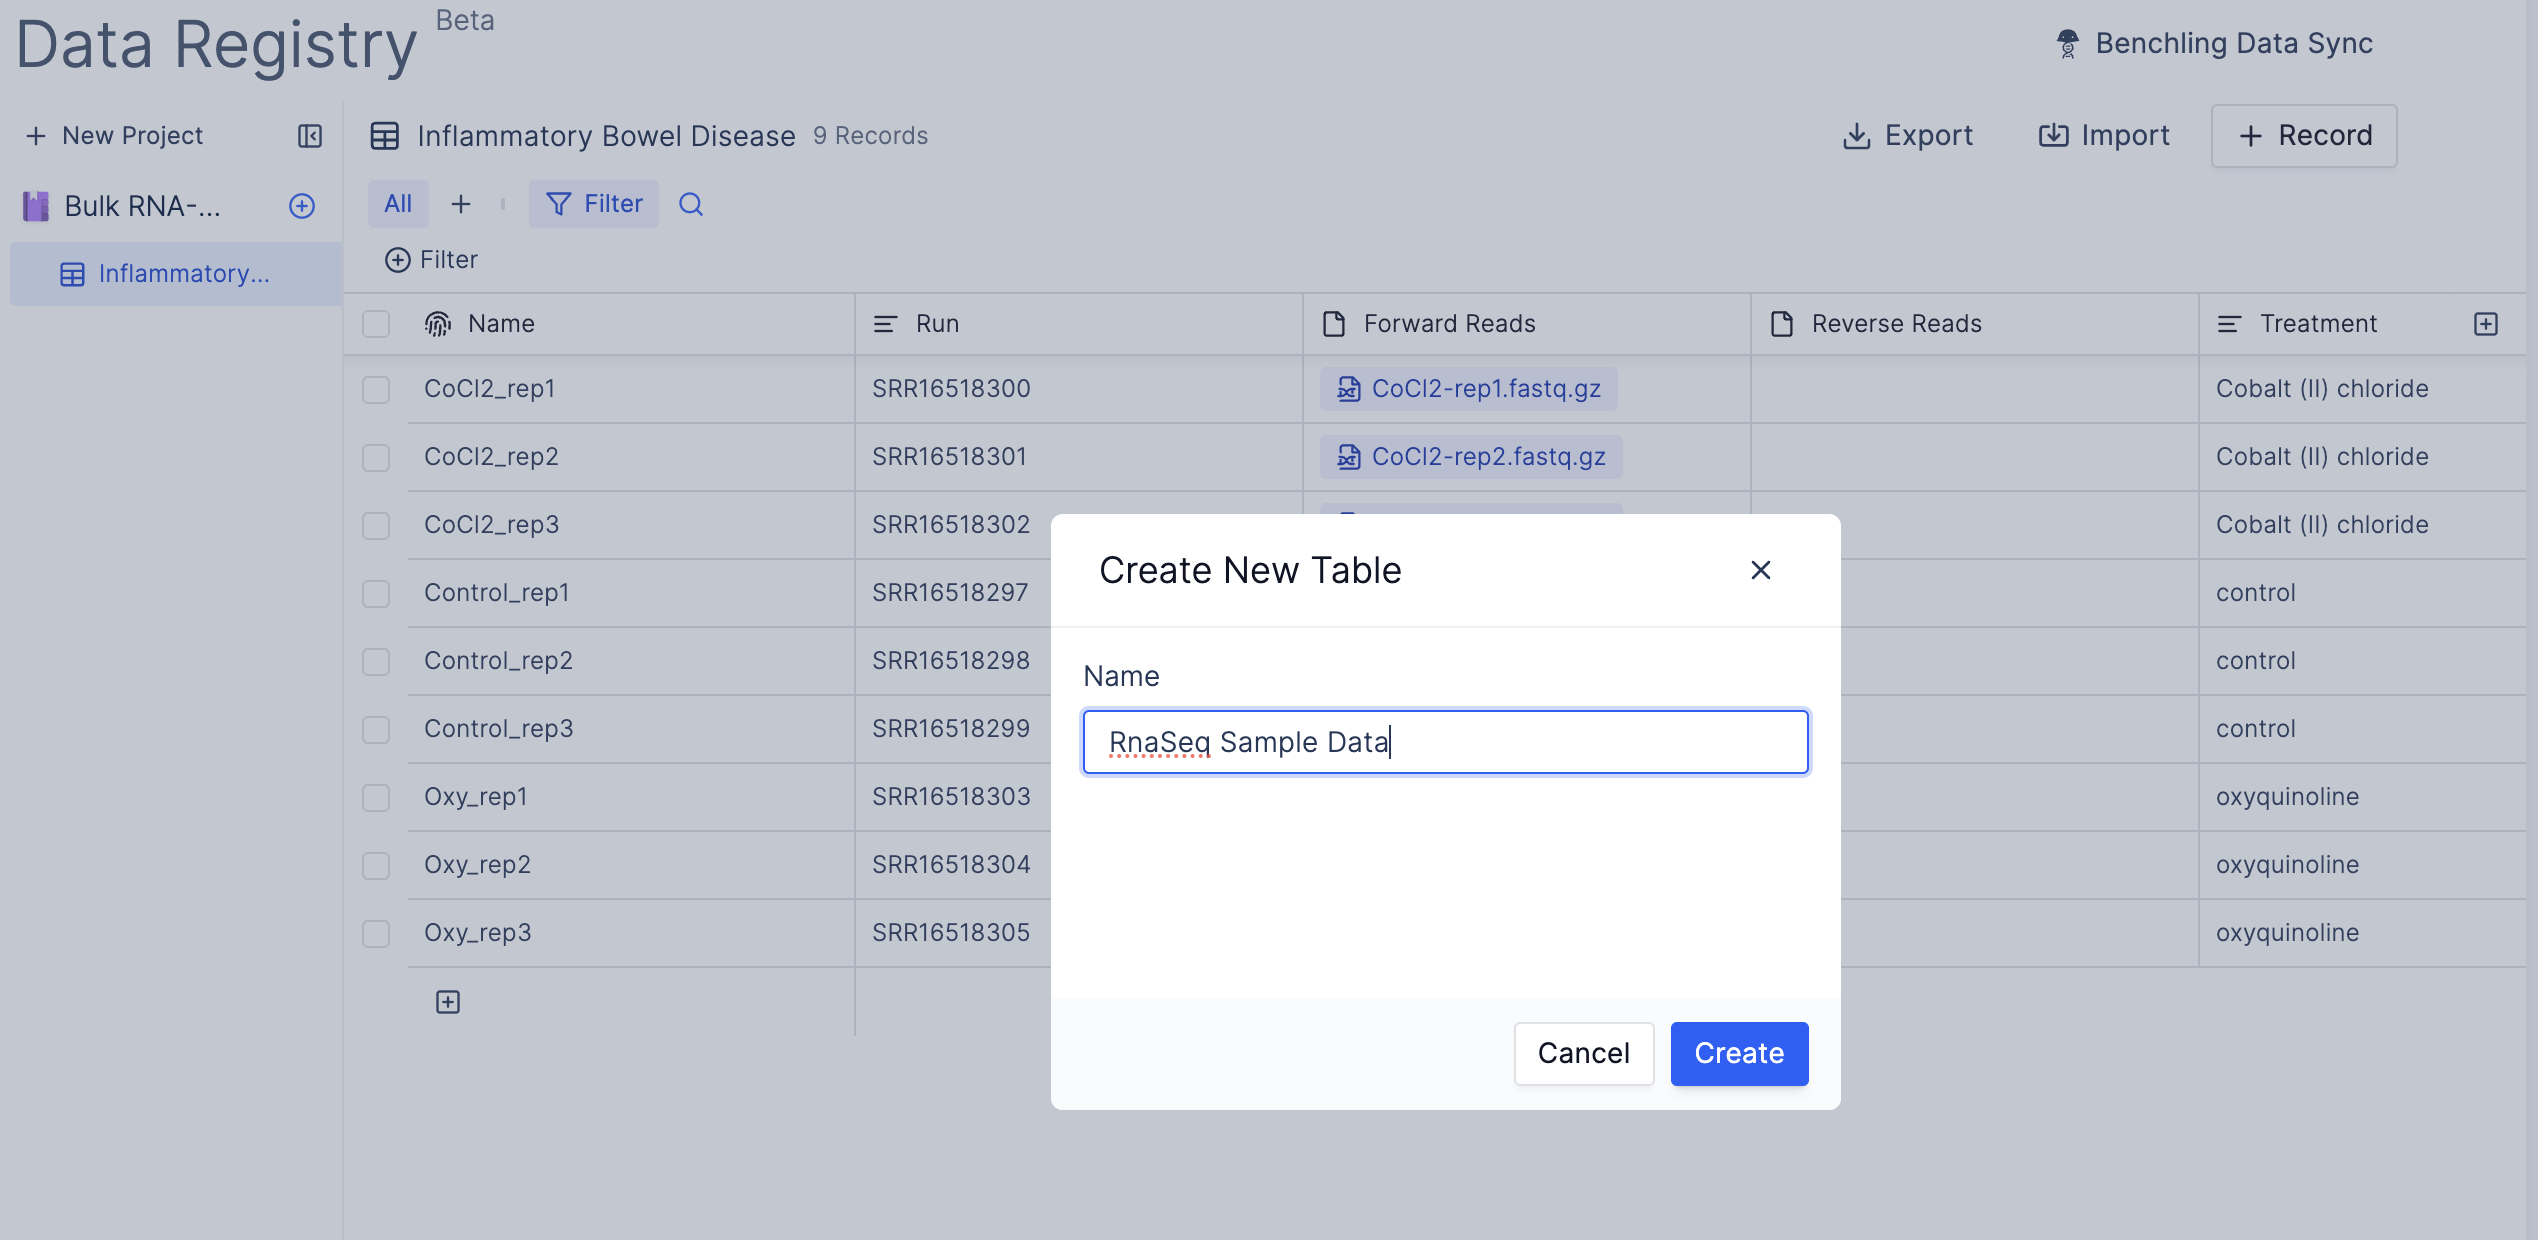
- Select the table you just created and click “Import CSV”. This will open up the Latch Data filesystem. Import the
samplesheet.csvfile you copied from the provided test data.
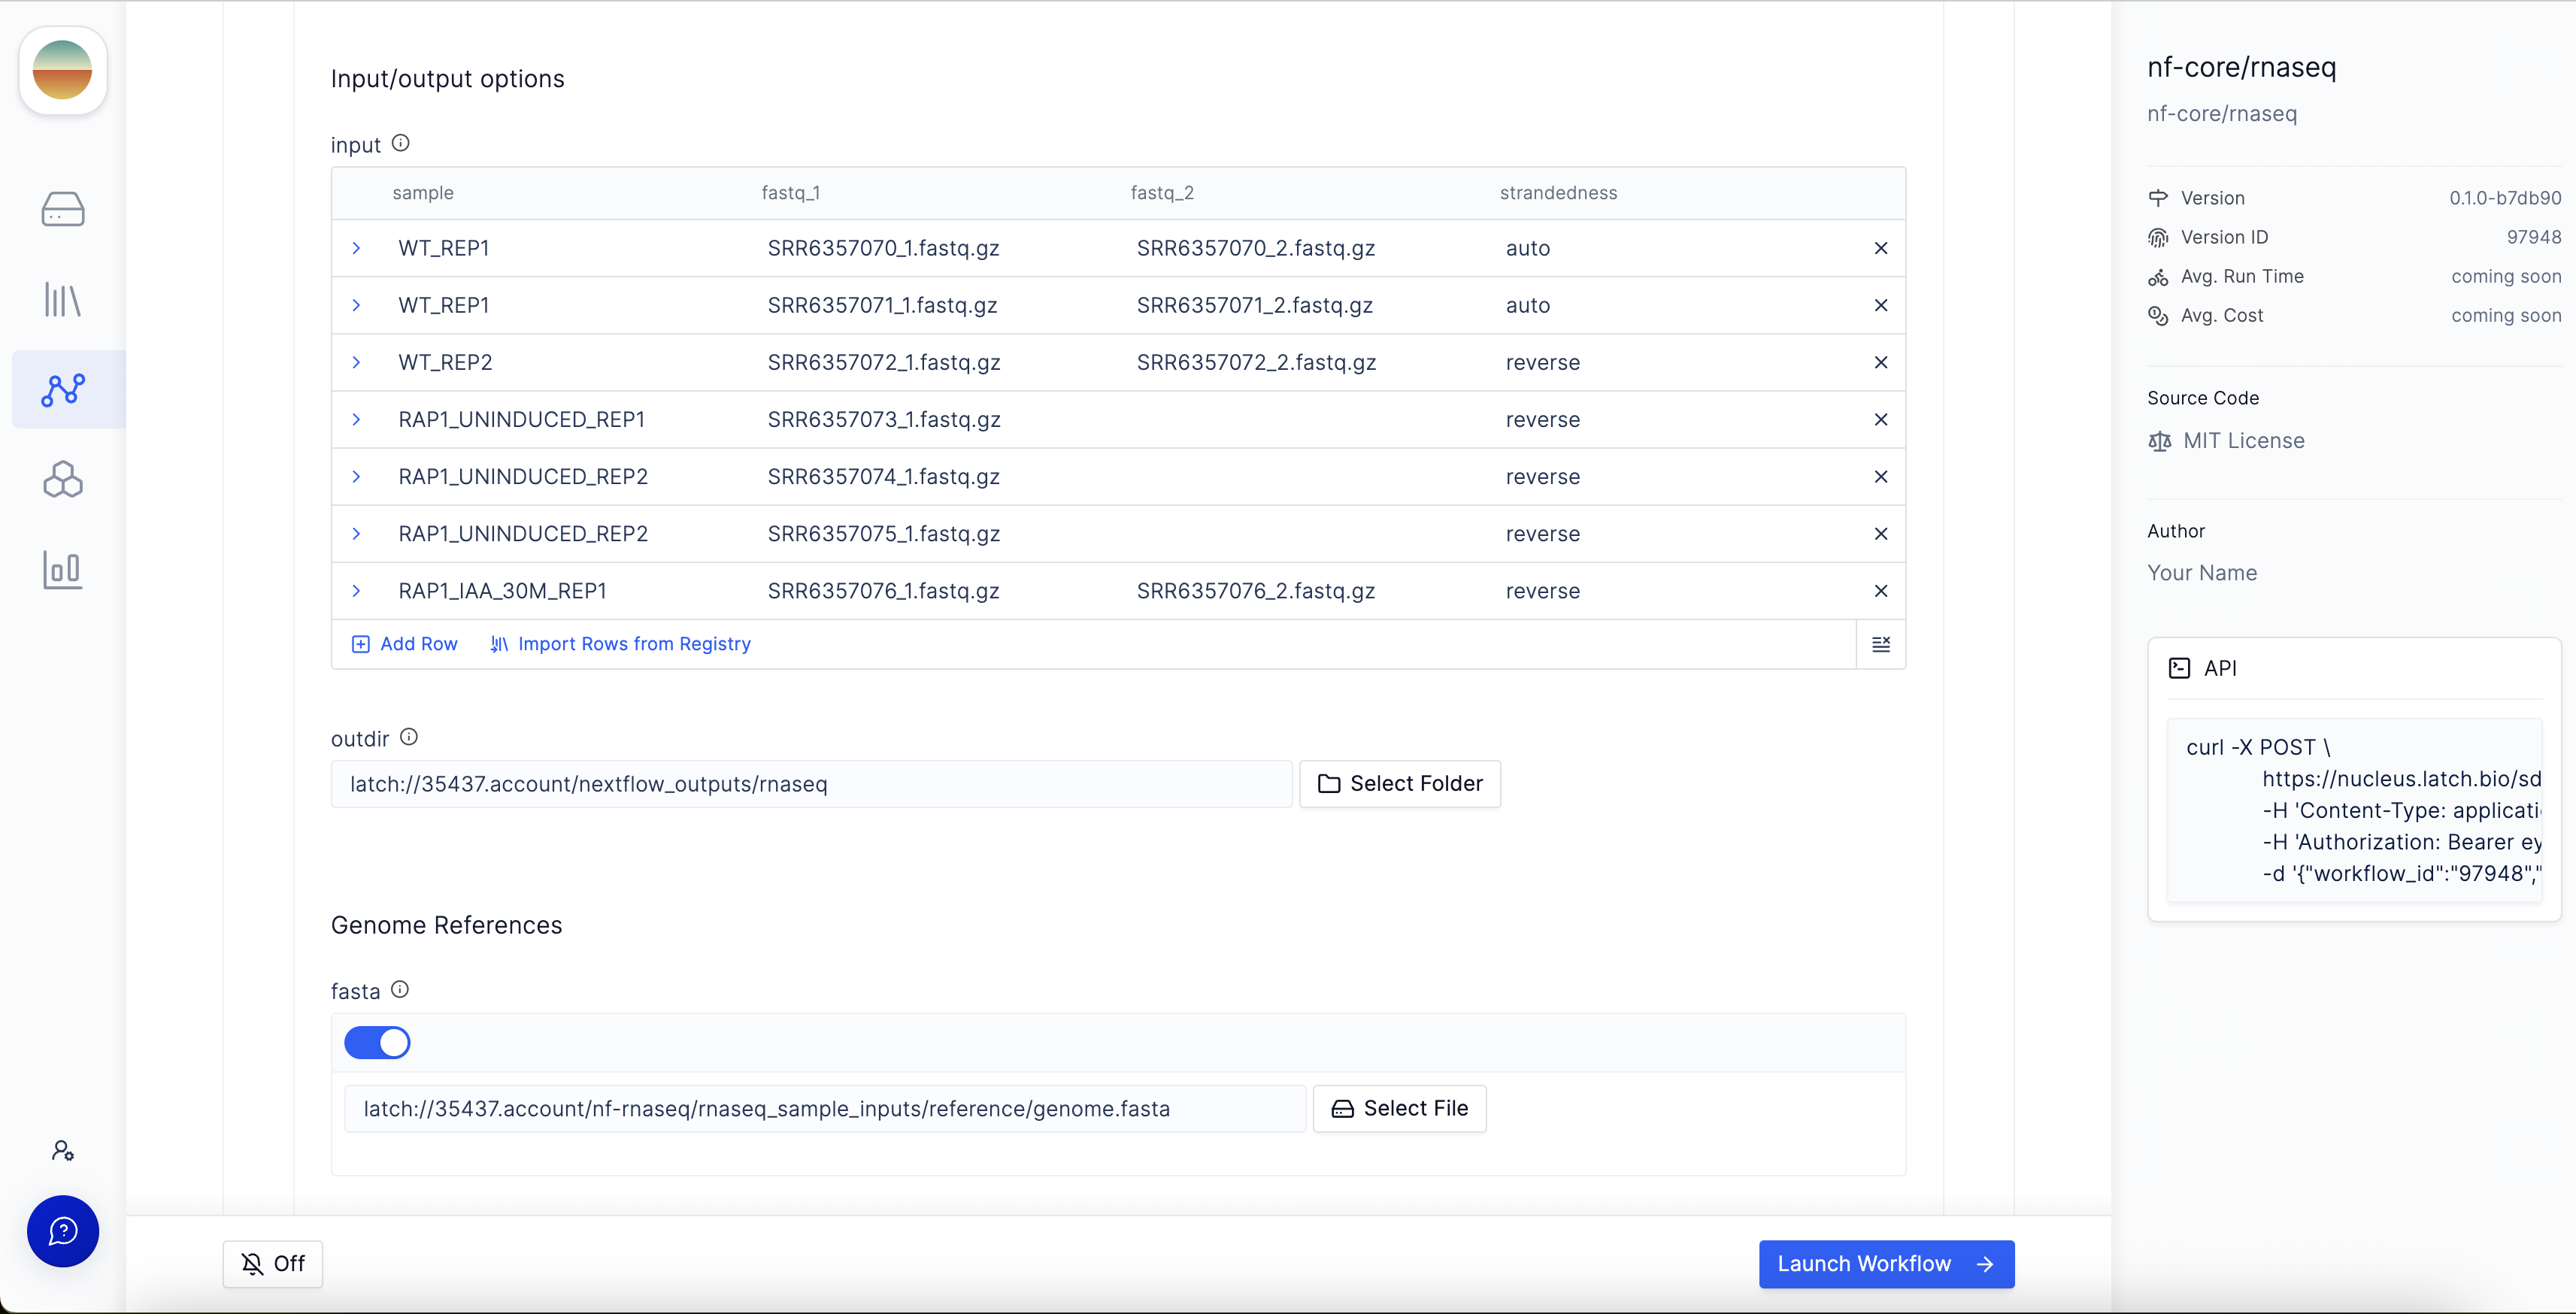
Launch Workflow in the bottom right corner to execute the workflow.
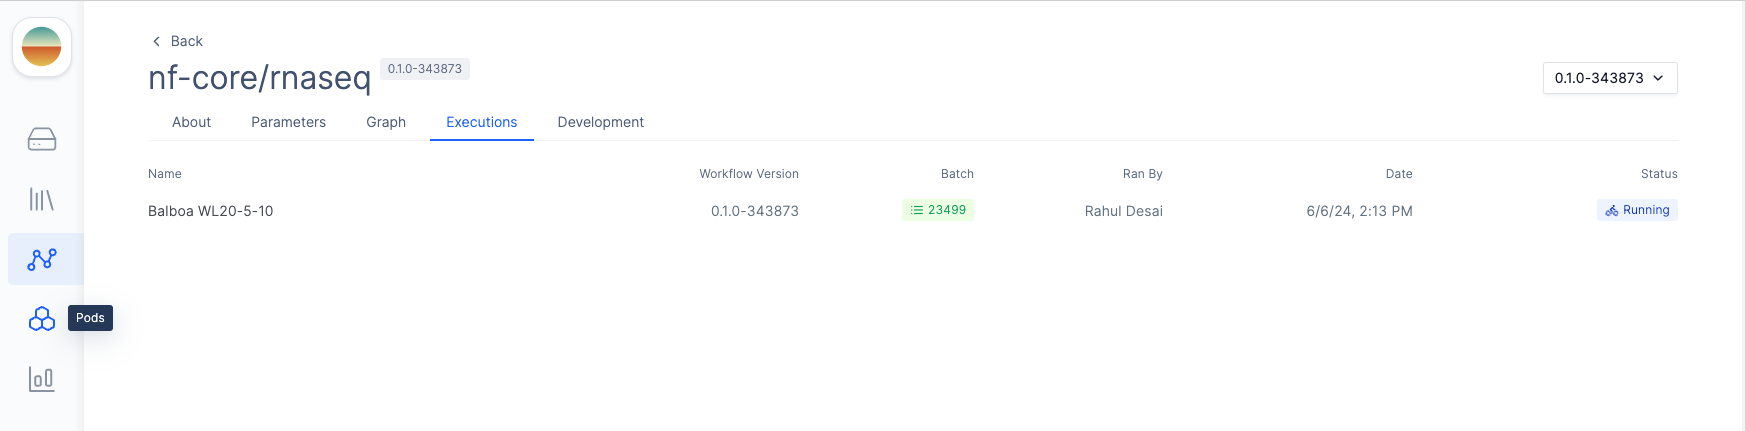
Step 5: Monitoring the workflow
After launching the workflow, you can monitor progress by clicking on the appropriate execution under theExecutions tab of your workflow.
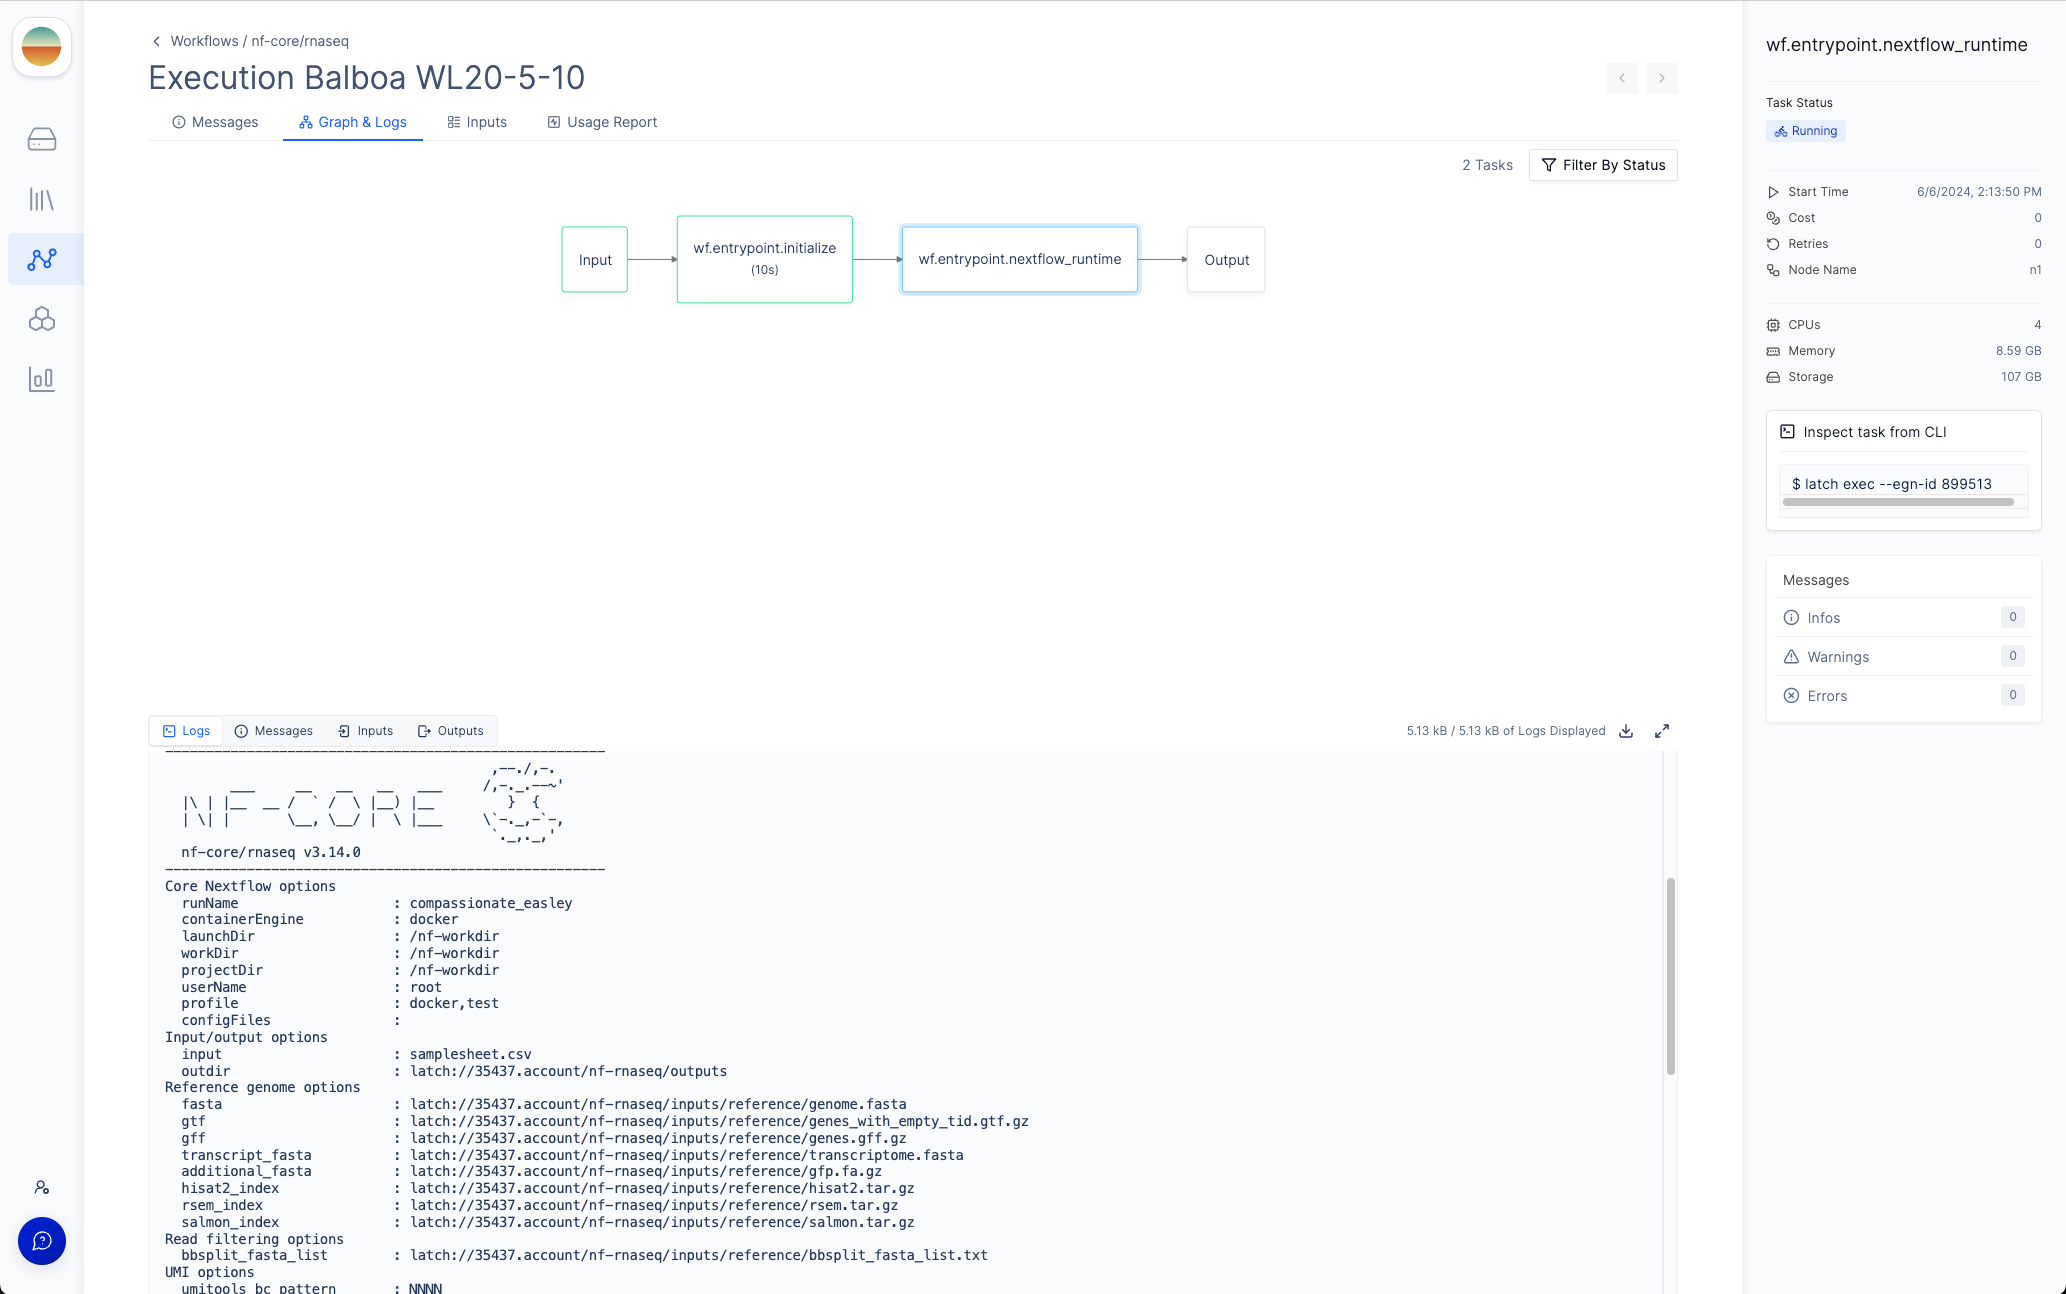
Graph & Logs tab, you can view the generated two-stage DAG with the initialization step and the Nextflow runtime task.
If you click on the Nextflow runtime node, you can view the runtime logs generated by Nextflow.
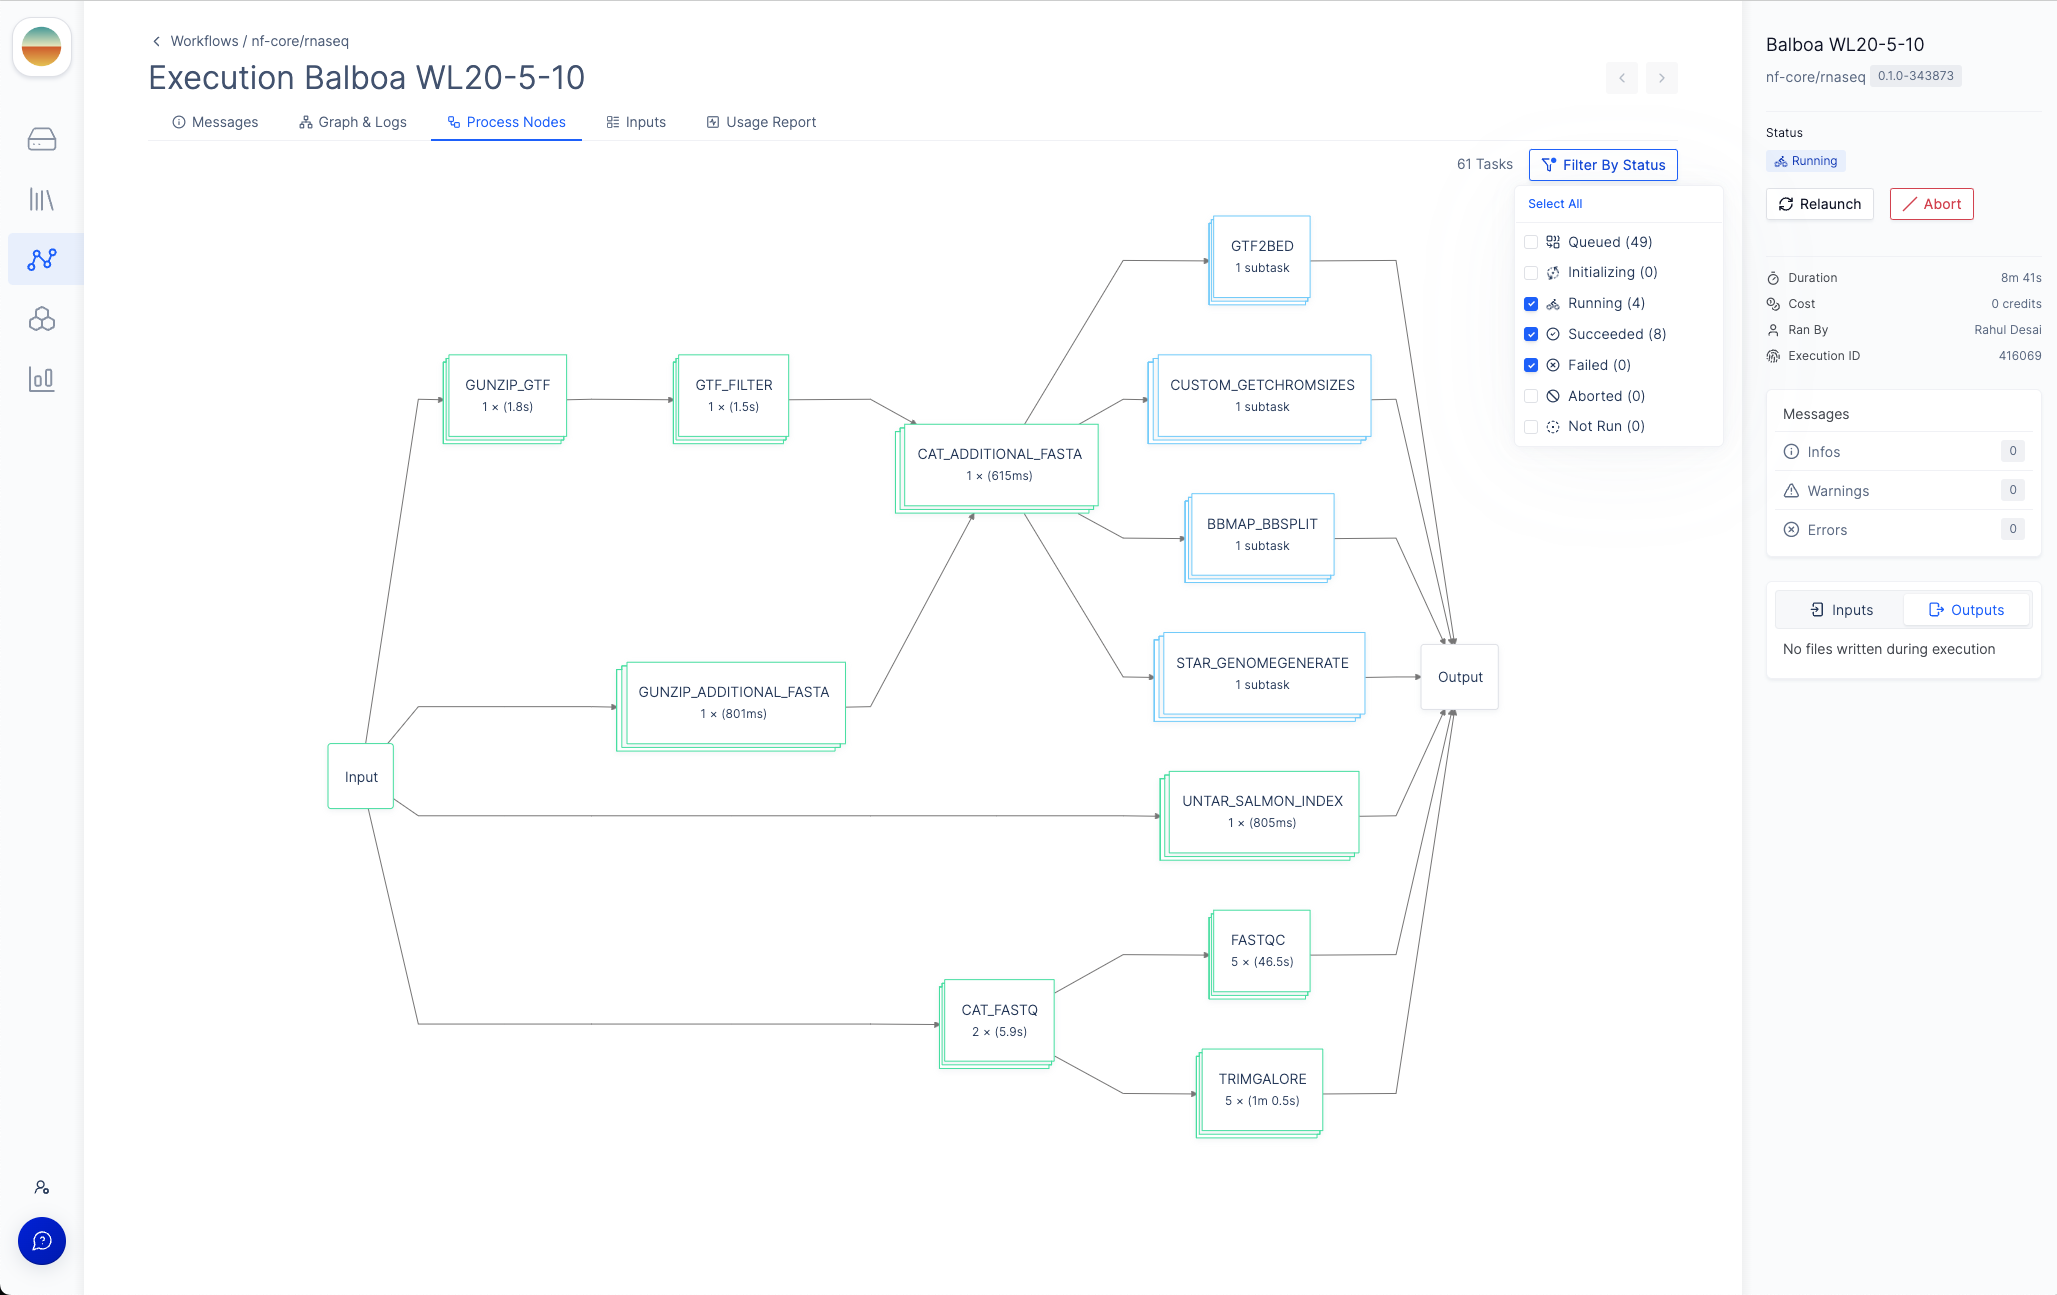
Process Nodes tab will appear in the menu bar where you can monitor the status of each process in the workflow.
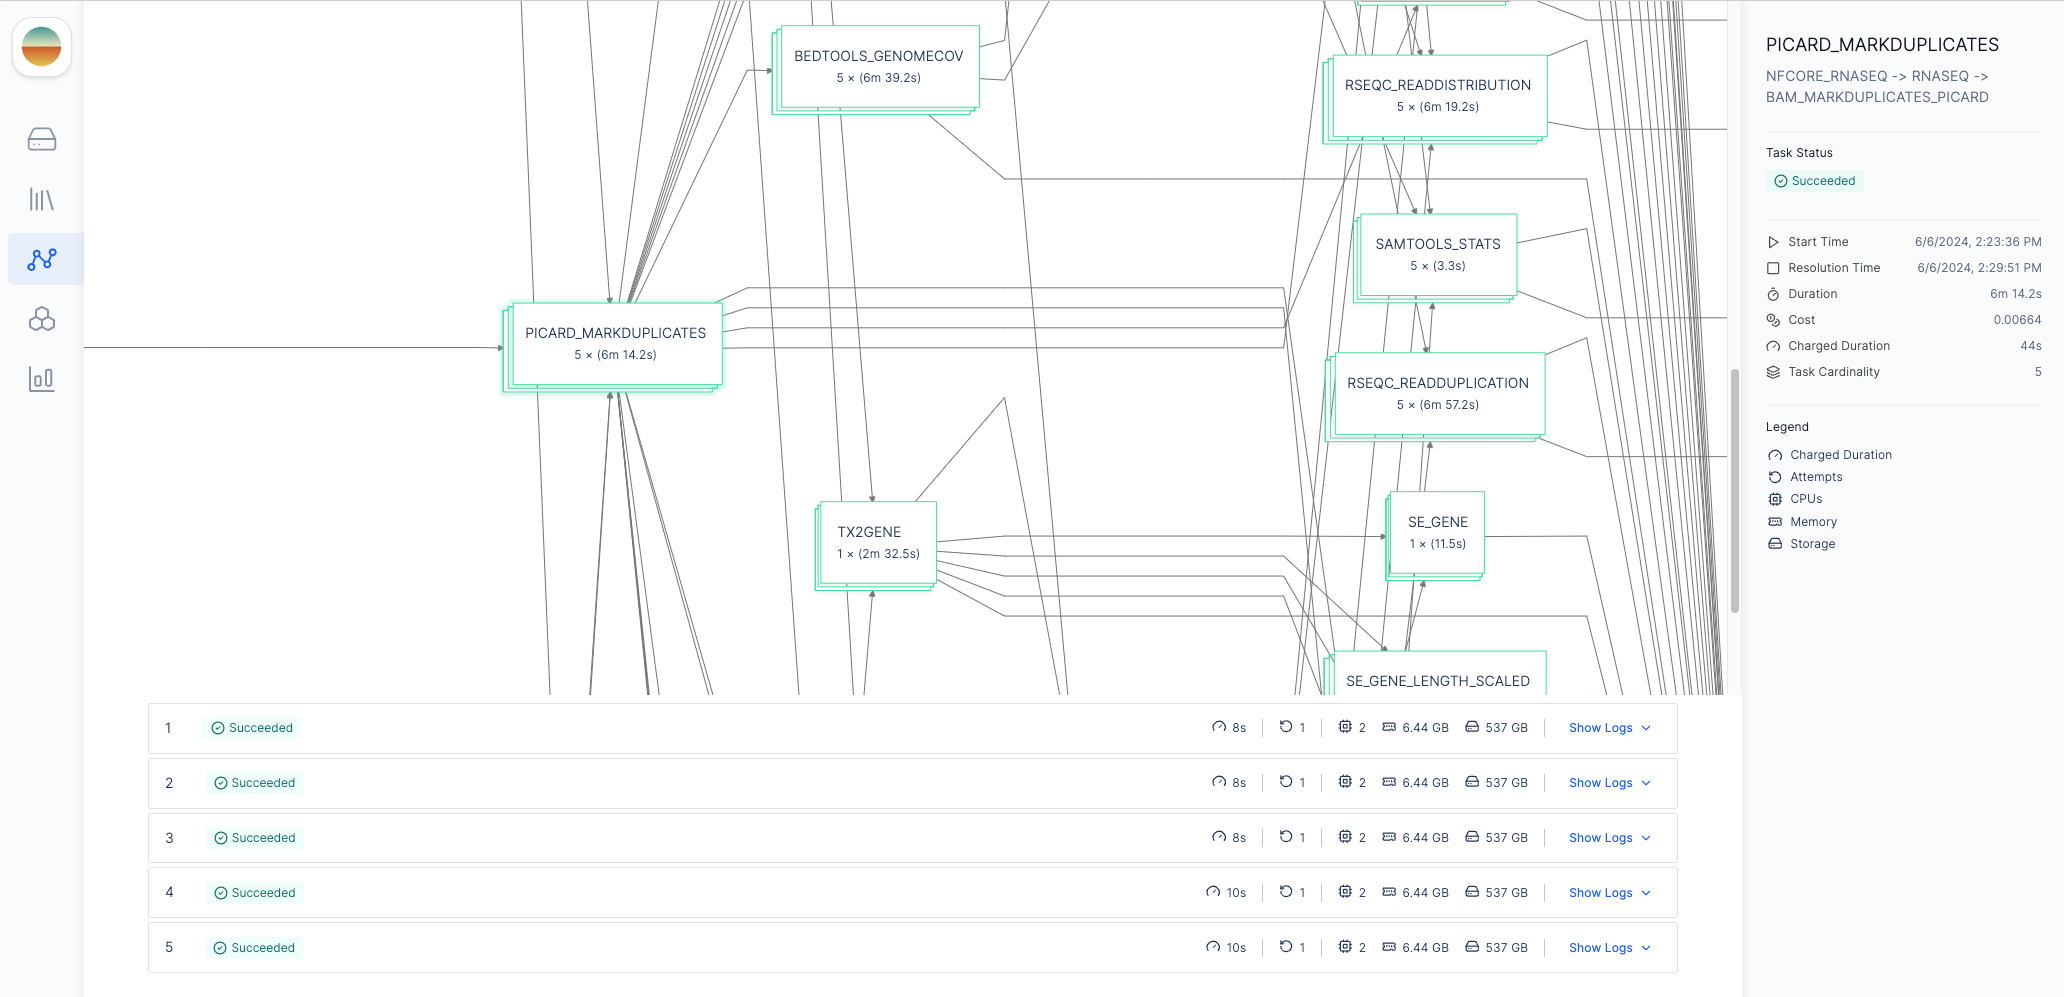
Each node in the DAG represents a process in the Nextflow pipeline.
To more easily navigate the graph, you can filter the process nodes by
execution status by clicking the “Filter by Status” button in the top right
corner.
outdir parameter
to prepend publishDir paths. For example, if we set our outdir parameter to latch:///nf-rnaseq/outputs, all pipeline outputs will be published to the
nf-rnaseq/outputs directory in Latch Data.

Step 6 (Optional): Adding Python Tasks for Pre- and Post-Processing
Thelatch register command generates a Latch workflow that runs your Nextflow pipeline. You can add custom Python tasks that interact with Latch (e.g. modify the workflow execution name on Latch Executions page) without modifying your original Nextflow code. This allows you to extend functionality while keeping your pipeline unchanged.
In this tutorial, we will modify the generated wf/entrypoint.py and the latch_metadata/__init__.py files to add a Run Name parameter that will be used to namespace the outputs of the Nextflow pipeline.
To do this, add the run_name field to the WorkflowArgsType dataclass in latch_metadata/__init__.py as below:
latch_metadata/__init__.py#
@dataclass
class WorkflowArgsType(NextflowSchemaArgsType):
    run_name: str
nextflow_runtime task to use this new parameter:
@nextflow_runtime_task(cpu=4, memory=8, storage_gib=100)
def nextflow_runtime(
    pvc_name: str,
    args: WorkflowArgsType
) -> None:
    args.outdir = LatchDir(f"{args.outdir.remote_path}/{args.run_name}") # Updated
    ...
--nf-script flag in the latch register command to avoid re-generating the Latch SDK workflow code (which will overwrite our updates).
latch register .
What You’ve Learned
Core Concepts:- Nextflow on Latch allows running containerized pipelines with a graphical web interface.
- Metadata generation (
latch generate-metadata) convertsnextflow_schema.jsoninto Python definitions for parameters and UI configuration. - Latch Registry integration can replace error-prone CSV inputs with a structured and type-safe Registry UI.
- Clone your Nextflow pipeline (e.g., nf-core/rnaseq).
- Generate metadata from
nextflow_schema.json. - Register the pipeline with
latch register --nf-script main.nfand required execution profiles. - Upload test data to Latch and select inputs from the Console.
- Monitor execution with the Graph & Logs and Process Nodes views.
- Customize the generated
entrypoint.pyfor additional pre- or post-processing logic. - Re-register without
--nf-scriptto preserve your code modifications.
Next Steps
- Explore custom workflow interfaces
- Learn about testing and debugging workflows
- Learn how caching and retries work to speed up iteration