> ## Documentation Index
> Fetch the complete documentation index at: https://wiki.latch.bio/llms.txt
> Use this file to discover all available pages before exploring further.
# Skills
> Built-in technology skills and custom skills from private GitHub repositories.
Skills are prompt packages that teach the agent new capabilities — domain-specific workflows, analysis templates, institutional conventions, or technology-specific guidance. Each skill is a directory with a `SKILL.md` entrypoint that the agent loads on demand based on context.
## Developing Skills (Branch Workflow)
You can test skill changes on a branch before merging to `main` by pinning a notebook to a specific `latch-skills` branch.
Push a branch to the [`latch-skills`](https://github.com/latchbio/latch-skills) repository with your changes (new or modified skills).
In **Edit** mode, open **Runtime Settings** (via the runtime dropdown in the notebook top bar) and select your branch from the **Skills Branch** picker.
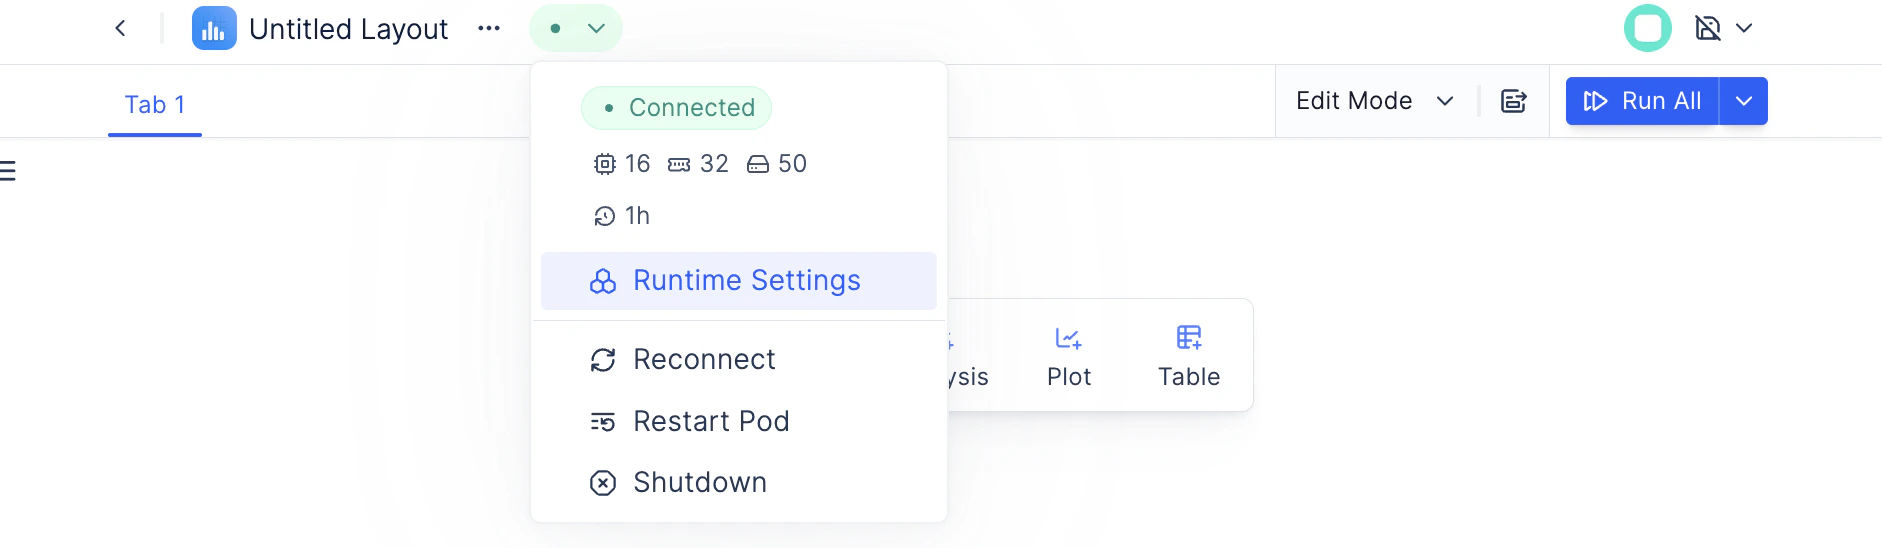 Restart the notebook runtime. On startup, the agent clones `latch-skills` at your chosen branch instead of `main`.
Send a prompt that should trigger your skill. Verify the agent loads and uses it correctly.
Once verified, merge your branch into `main`. Clear the Skills Branch setting (or leave it as default) so the notebook tracks `main` going forward.
The skills branch setting is per-notebook and persists across restarts. On every restart, the runtime fetches the latest commit on the configured branch, so you can push updates and restart without changing the setting.
## Built-in Skills
Every agent session includes Latch's public skill set from [`latch-skills`](https://github.com/latchbio/latch-skills). These are cloned automatically at startup — no registration required. By default, the `main` branch is used. See [Developing Skills](#developing-skills-branch-workflow) above to test on a different branch.
### Platform Skills
Core Latch Plots APIs and patterns:
| Skill | Description |
| ------------------- | -------------------------------------------------------------------------------------------------------------------------------- |
| `latch-plots-ui` | Widget APIs for output (plots, tables, H5 viewers), user input (selects, sliders, checkboxes), and layout (rows, columns, grids) |
| `latch-data-access` | File selection widgets, Latch Data browsing, Registry tables, and LPath utilities for `latch://` paths |
| `latch-workflows` | Launching and monitoring bioinformatics workflows — parameter construction, validation, and output retrieval |
| `latch-curation` | Curating external datasets (GEO/GSE) into Latch-compatible AnnData with Ensembl gene IDs and ontology-annotated metadata |
### Technology Skills
Provider-specific analysis workflows and best practices:
| Skill | Technology | Description |
| --------------- | ----------------------- | ---------------------------------------------------------------------------------------------------- |
| `takara-devkit` | Takara Seeker / Trekker | QC, background removal, normalization, clustering, differential expression, and cell typing |
| `xenium-devkit` | 10x Xenium | Data preparation, preprocessing, differential expression, cell type annotation, and domain detection |
| `vizgen-devkit` | Vizgen MERFISH | Cell segmentation, preprocessing, QC, spatial analysis, and secondary analysis |
| `atlasx-devkit` | AtlasXomics DBiT-seq | QC, clustering, differential analysis, and cell type annotation for spatial ATAC-seq |
## Custom Skills
Organization admins can register private GitHub repositories containing custom skills that get loaded into agent runtimes across all workspaces in the organization.
## Skill Repository Structure
A skill repository must follow this structure:
```
my-org-skills/
├── README.md # For humans browsing GitHub (not loaded by agent)
│
├── spatial-analysis/ # Each top-level directory = one skill
│ ├── SKILL.md # Required: skill entrypoint
│ ├── reference.md # Optional: supporting documentation
│ └── examples/
│ └── xenium-workflow.md # Optional: example outputs
│
├── curation/
│ ├── SKILL.md
│ ├── steps/
│ │ ├── harmonize.md
│ │ └── download.md
│ └── scripts/
│ └── validate.py # Optional: scripts the agent can execute
│
└── volcano-plot/
├── SKILL.md
└── templates/
└── template.md # Optional: templates for the agent to fill in
```
### Rules
* Each top-level directory containing a `SKILL.md` file becomes a skill
* Only one level of skill directories — no nesting skills inside skills
* `README.md` at the repo root is for GitHub — the agent does not load it
* Skill directory names must be **unique across all registered repos** in an organization. If two repos define the same skill name, syncing will fail.
## Writing a SKILL.md
Every skill needs a `SKILL.md` file with YAML frontmatter and markdown instructions:
```yaml theme={null}
---
name: spatial-analysis
description: >
Spatial transcriptomics analysis workflows. Use when the user is
working with Xenium, Visium, or MERFISH data and needs help with
spatial analysis, neighborhood detection, or co-expression.
---
When performing spatial analysis:
1. Identify the technology platform from the data
2. Load the appropriate reference panel
3. Follow the platform-specific QC workflow
4. Generate spatial plots with appropriate coloring
For detailed API usage, see [reference.md](reference.md).
```
### Required Fields
| Field | Description |
| ------------- | ------------------------------------------------------------------------------------------------------------ |
| `name` | Lowercase letters, numbers, and hyphens only (max 64 characters). Used as the skill identifier. |
| `description` | What the skill does and when to use it. The agent reads this to decide when to load the skill automatically. |
### Optional Fields
| Field | Description |
| -------------------------- | ---------------------------------------------------------------------------------- |
| `allowed-tools` | Restrict which tools the agent can use (e.g., `Read, Grep, Glob`). |
| `disable-model-invocation` | Set to `true` to prevent auto-loading. The skill can only be triggered explicitly. |
| `argument-hint` | Hint shown for expected arguments (e.g., `[dataset-name]`). |
### Supporting Files
Keep `SKILL.md` focused and under 500 lines. Move detailed reference material to separate files and link them from `SKILL.md`:
```markdown theme={null}
## Additional resources
- For complete API details, see [reference.md](reference.md)
- For usage examples, see [examples/](examples/)
```
The agent loads supporting files on demand when it follows a link from `SKILL.md`.
## Merging Multiple Repositories
When multiple repositories are registered with the same target path (the default `.claude/skills/`), their skill directories are merged side by side:
```
.claude/skills/
├── xenium-qc/ # from repo A
├── lab-conventions/ # from repo A
├── my-custom-plots/ # from repo B
└── curation/ # from repo B
```
Skill directory names must be unique across all repos. If two repos both define a `spatial-analysis/` skill, syncing will fail and the conflict will be reported in **Organization Settings → Agent Skills**.
## Registering a Repository
Generate a [GitHub PAT](https://github.com/settings/tokens) with **repo** scope so the agent runtime can clone private repositories.
Go to **Organization Settings → Agent Skills → GitHub Authentication** and enter your GitHub username and token.
Click **Add Repository** and provide:
* **Display Name**: A human-readable label (e.g., "Our Lab Skills")
* **Repository URL**: The HTTPS clone URL (e.g., `https://github.com/my-org/agent-skills.git`)
* **Branch**: The branch to track (defaults to `main`)
* **Target Path**: Where to mount in the runtime (defaults to `.claude/skills`)
When a new workspace agent session starts, the registered repositories are cloned into the runtime. The agent discovers all skills automatically.
## How Skills Are Loaded
When an agent runtime starts in a workspace belonging to your organization:
1. All registered repositories are cloned using the org's GitHub PAT
2. Skill directory names are checked for uniqueness — conflicts block the sync
3. The agent discovers `SKILL.md` files and reads their `description` fields
4. During a session, the agent automatically loads a skill when your request matches its description
Skills do not need to be invoked explicitly — the agent decides when they are relevant based on the conversation.
## Example: Technology-Specific Skill
```yaml theme={null}
---
name: xenium-qc
description: >
Xenium spatial transcriptomics QC workflow. Use when the user has
Xenium data and needs quality control, transcript filtering, or
cell segmentation validation.
---
## Xenium QC Workflow
1. Load the Xenium output bundle with `xeniumranger`
2. Check transcript counts per cell (expect >50 median)
3. Validate cell segmentation boundaries
4. Filter low-quality cells (< 20 transcripts)
5. Generate spatial QC plots
For platform-specific thresholds, see [reference.md](reference.md).
```
## Example: Institutional Conventions Skill
```yaml theme={null}
---
name: lab-conventions
description: >
Lab-specific analysis conventions and standards. Use when generating
plots, writing methods sections, or exporting results.
---
## Plot Standards
- Use colorblind-safe palettes (viridis, cividis)
- Font size: 12pt for labels, 10pt for ticks
- Always include scale bars on spatial plots
- Export as both PNG (300 DPI) and SVG
## Methods Sections
When writing methods text, cite the following versions:
- scanpy 1.10.x
- squidpy 1.4.x
- anndata 0.10.x
```
Restart the notebook runtime. On startup, the agent clones `latch-skills` at your chosen branch instead of `main`.
Send a prompt that should trigger your skill. Verify the agent loads and uses it correctly.
Once verified, merge your branch into `main`. Clear the Skills Branch setting (or leave it as default) so the notebook tracks `main` going forward.
The skills branch setting is per-notebook and persists across restarts. On every restart, the runtime fetches the latest commit on the configured branch, so you can push updates and restart without changing the setting.
## Built-in Skills
Every agent session includes Latch's public skill set from [`latch-skills`](https://github.com/latchbio/latch-skills). These are cloned automatically at startup — no registration required. By default, the `main` branch is used. See [Developing Skills](#developing-skills-branch-workflow) above to test on a different branch.
### Platform Skills
Core Latch Plots APIs and patterns:
| Skill | Description |
| ------------------- | -------------------------------------------------------------------------------------------------------------------------------- |
| `latch-plots-ui` | Widget APIs for output (plots, tables, H5 viewers), user input (selects, sliders, checkboxes), and layout (rows, columns, grids) |
| `latch-data-access` | File selection widgets, Latch Data browsing, Registry tables, and LPath utilities for `latch://` paths |
| `latch-workflows` | Launching and monitoring bioinformatics workflows — parameter construction, validation, and output retrieval |
| `latch-curation` | Curating external datasets (GEO/GSE) into Latch-compatible AnnData with Ensembl gene IDs and ontology-annotated metadata |
### Technology Skills
Provider-specific analysis workflows and best practices:
| Skill | Technology | Description |
| --------------- | ----------------------- | ---------------------------------------------------------------------------------------------------- |
| `takara-devkit` | Takara Seeker / Trekker | QC, background removal, normalization, clustering, differential expression, and cell typing |
| `xenium-devkit` | 10x Xenium | Data preparation, preprocessing, differential expression, cell type annotation, and domain detection |
| `vizgen-devkit` | Vizgen MERFISH | Cell segmentation, preprocessing, QC, spatial analysis, and secondary analysis |
| `atlasx-devkit` | AtlasXomics DBiT-seq | QC, clustering, differential analysis, and cell type annotation for spatial ATAC-seq |
## Custom Skills
Organization admins can register private GitHub repositories containing custom skills that get loaded into agent runtimes across all workspaces in the organization.
## Skill Repository Structure
A skill repository must follow this structure:
```
my-org-skills/
├── README.md # For humans browsing GitHub (not loaded by agent)
│
├── spatial-analysis/ # Each top-level directory = one skill
│ ├── SKILL.md # Required: skill entrypoint
│ ├── reference.md # Optional: supporting documentation
│ └── examples/
│ └── xenium-workflow.md # Optional: example outputs
│
├── curation/
│ ├── SKILL.md
│ ├── steps/
│ │ ├── harmonize.md
│ │ └── download.md
│ └── scripts/
│ └── validate.py # Optional: scripts the agent can execute
│
└── volcano-plot/
├── SKILL.md
└── templates/
└── template.md # Optional: templates for the agent to fill in
```
### Rules
* Each top-level directory containing a `SKILL.md` file becomes a skill
* Only one level of skill directories — no nesting skills inside skills
* `README.md` at the repo root is for GitHub — the agent does not load it
* Skill directory names must be **unique across all registered repos** in an organization. If two repos define the same skill name, syncing will fail.
## Writing a SKILL.md
Every skill needs a `SKILL.md` file with YAML frontmatter and markdown instructions:
```yaml theme={null}
---
name: spatial-analysis
description: >
Spatial transcriptomics analysis workflows. Use when the user is
working with Xenium, Visium, or MERFISH data and needs help with
spatial analysis, neighborhood detection, or co-expression.
---
When performing spatial analysis:
1. Identify the technology platform from the data
2. Load the appropriate reference panel
3. Follow the platform-specific QC workflow
4. Generate spatial plots with appropriate coloring
For detailed API usage, see [reference.md](reference.md).
```
### Required Fields
| Field | Description |
| ------------- | ------------------------------------------------------------------------------------------------------------ |
| `name` | Lowercase letters, numbers, and hyphens only (max 64 characters). Used as the skill identifier. |
| `description` | What the skill does and when to use it. The agent reads this to decide when to load the skill automatically. |
### Optional Fields
| Field | Description |
| -------------------------- | ---------------------------------------------------------------------------------- |
| `allowed-tools` | Restrict which tools the agent can use (e.g., `Read, Grep, Glob`). |
| `disable-model-invocation` | Set to `true` to prevent auto-loading. The skill can only be triggered explicitly. |
| `argument-hint` | Hint shown for expected arguments (e.g., `[dataset-name]`). |
### Supporting Files
Keep `SKILL.md` focused and under 500 lines. Move detailed reference material to separate files and link them from `SKILL.md`:
```markdown theme={null}
## Additional resources
- For complete API details, see [reference.md](reference.md)
- For usage examples, see [examples/](examples/)
```
The agent loads supporting files on demand when it follows a link from `SKILL.md`.
## Merging Multiple Repositories
When multiple repositories are registered with the same target path (the default `.claude/skills/`), their skill directories are merged side by side:
```
.claude/skills/
├── xenium-qc/ # from repo A
├── lab-conventions/ # from repo A
├── my-custom-plots/ # from repo B
└── curation/ # from repo B
```
Skill directory names must be unique across all repos. If two repos both define a `spatial-analysis/` skill, syncing will fail and the conflict will be reported in **Organization Settings → Agent Skills**.
## Registering a Repository
Generate a [GitHub PAT](https://github.com/settings/tokens) with **repo** scope so the agent runtime can clone private repositories.
Go to **Organization Settings → Agent Skills → GitHub Authentication** and enter your GitHub username and token.
Click **Add Repository** and provide:
* **Display Name**: A human-readable label (e.g., "Our Lab Skills")
* **Repository URL**: The HTTPS clone URL (e.g., `https://github.com/my-org/agent-skills.git`)
* **Branch**: The branch to track (defaults to `main`)
* **Target Path**: Where to mount in the runtime (defaults to `.claude/skills`)
When a new workspace agent session starts, the registered repositories are cloned into the runtime. The agent discovers all skills automatically.
## How Skills Are Loaded
When an agent runtime starts in a workspace belonging to your organization:
1. All registered repositories are cloned using the org's GitHub PAT
2. Skill directory names are checked for uniqueness — conflicts block the sync
3. The agent discovers `SKILL.md` files and reads their `description` fields
4. During a session, the agent automatically loads a skill when your request matches its description
Skills do not need to be invoked explicitly — the agent decides when they are relevant based on the conversation.
## Example: Technology-Specific Skill
```yaml theme={null}
---
name: xenium-qc
description: >
Xenium spatial transcriptomics QC workflow. Use when the user has
Xenium data and needs quality control, transcript filtering, or
cell segmentation validation.
---
## Xenium QC Workflow
1. Load the Xenium output bundle with `xeniumranger`
2. Check transcript counts per cell (expect >50 median)
3. Validate cell segmentation boundaries
4. Filter low-quality cells (< 20 transcripts)
5. Generate spatial QC plots
For platform-specific thresholds, see [reference.md](reference.md).
```
## Example: Institutional Conventions Skill
```yaml theme={null}
---
name: lab-conventions
description: >
Lab-specific analysis conventions and standards. Use when generating
plots, writing methods sections, or exporting results.
---
## Plot Standards
- Use colorblind-safe palettes (viridis, cividis)
- Font size: 12pt for labels, 10pt for ticks
- Always include scale bars on spatial plots
- Export as both PNG (300 DPI) and SVG
## Methods Sections
When writing methods text, cite the following versions:
- scanpy 1.10.x
- squidpy 1.4.x
- anndata 0.10.x
```